Help Center / Account / Onboarding / Follow your onboarding journey
Onboarding
Follow your onboarding journey in VirtualPBX
Your Onboarding Journey in VirtualPBX is the setup path for a new account. Plan how calls should reach the company, add users and devices, create groups and voicemail boxes, set office hours, then choose incoming call handling and the main company number. Each section on the page is a toggle with the steps and screenshots. The Help Page links out to the longer Smarter Voice guides when a step needs more detail.
On this page
Congratulations on your new VirtualPBX account! We are excited to have you, and are ready to work together to make your business the best it can be. Below you will find a road map for all basic items needed to get your account up and running without a hitch.
Need more information? Check out our Knowledge base for any and all questions you have, or reach out to our team at (888) 825-0800
https://www.loom.com/share/ff346477d2204ff9bf98c3a5ec00abfb?sid=4d6ba170-0057-410f-9595-071caedb3159
Plan How Your PBX Will Work Best For You
Before setting up, deciding how you would like your dashboard to run is the first goal.
Here are some ideas to consider:
What would you like your customer’s journey to be when calling into your company? For example-
1) Would you like your customers to be greeted immediately by a virtual receptionist with main menu options on where to transfer with a custom greeting? 2) Would you like customers to immediately reach a specific person or department (I.e. a receptionist or sales department), and if not answered, be routed to a different place? 3) Would you like a customer to be routed to a virtual receptionist or directory if the initial transfer is not sent through?Do you have multiple departments you would like to be on your greetings? For example- do you have multiple people in departments such as sales and customer service that you would like your customers to be directed to?
Do you have specific office hours, or would you prefer to have the same greeting for customers 24/7?
Do you have holidays that you would like a customized greeting for?
Do you need texting set up for your account and customers?
Are reports on how the calls are coming in/how your agents are handling them important to your company?
Once your have your game plan, follow along our road map to get you fully set up!
Build Out Your Users
Adding a User
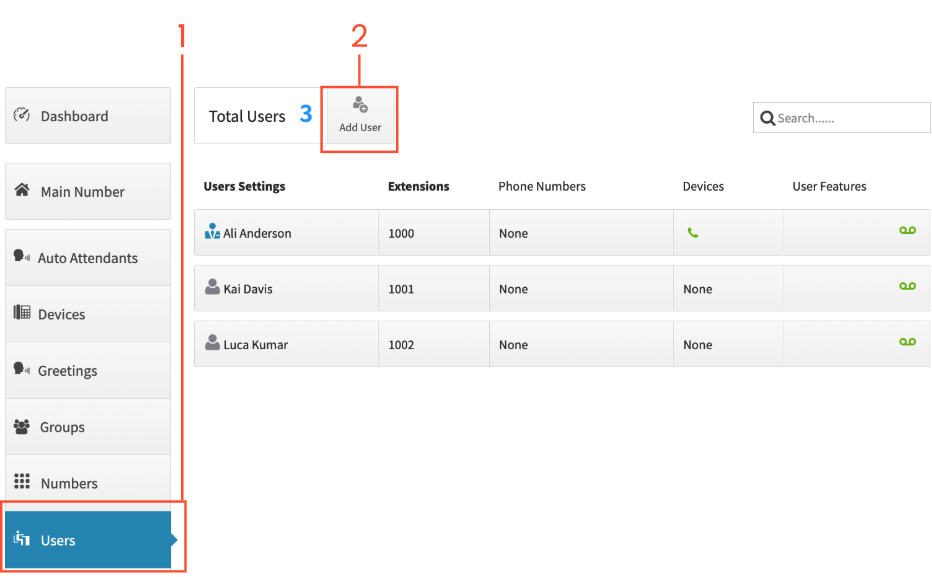
From the Dashboard, click on Users
At the top of the page, click on Add user
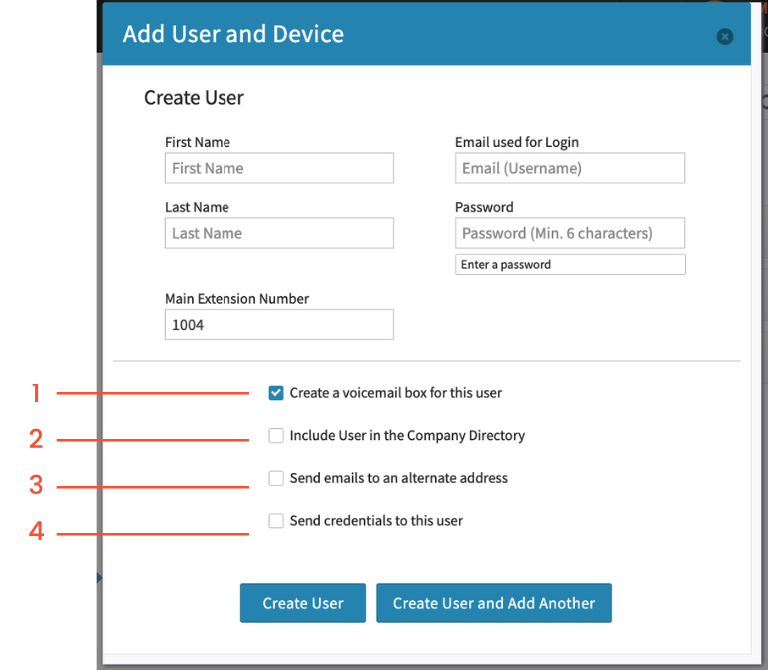
Automatically checked to create a voicemail box / enable the voicemail box feature for this user. We strongly recommend NOT deleting this voicemail box for the user.
Include User in the Company Directory: checking this will put the user in the SmartPBX directory. You can change this later.
Send emails to an alternate address: By default the system will send emails to the email address used for login. Checking this will send system emails to an email address other than the one used for login.
Send credentials to this user: checking this will send an email to the user with the login information for use at dash.virtualpbx.com
Fill out the form. If you are creating multiple users, click on ‘Create New and Add Another’, otherwise, click on ‘Create User’
The new user will now show up on the Users list.
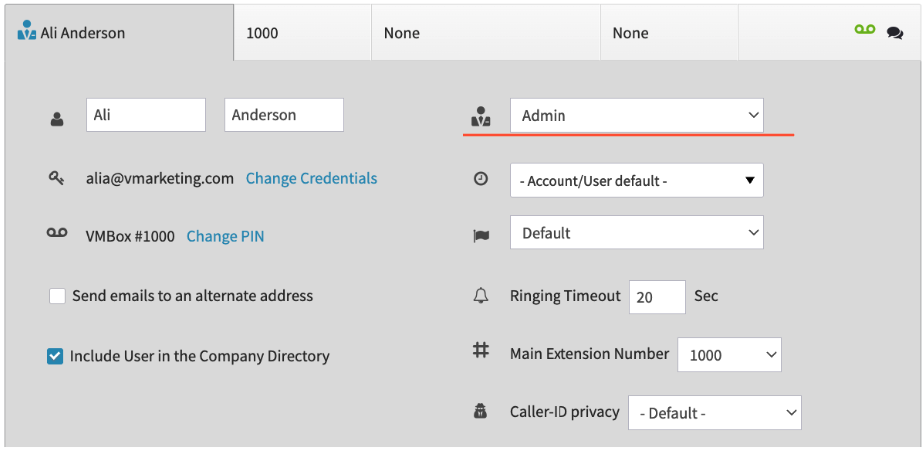
A typical user on your system will not be able to edit your dashboard. To update your new user to be an admin, click on their name on the users tab, and update to be an admin.
User Features
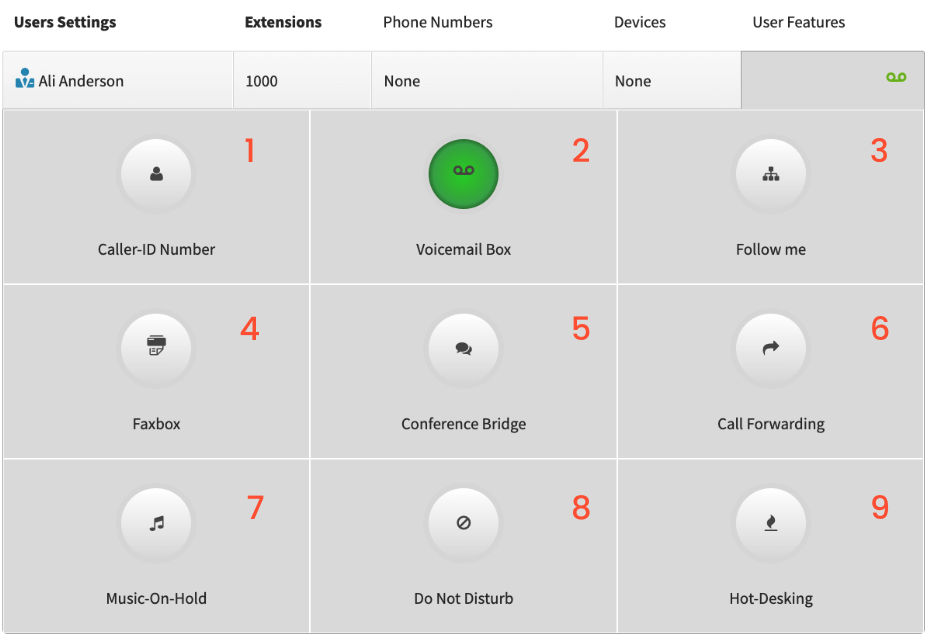
1. Caller-ID Number
Enables users to use their personal number as oppposed to the main number. You will need to have a number assigned to the user before utilizing Caller-ID Numbers.
- Turn the feature on when a number is assigned, and choose your new number.
2. Voicemail Box
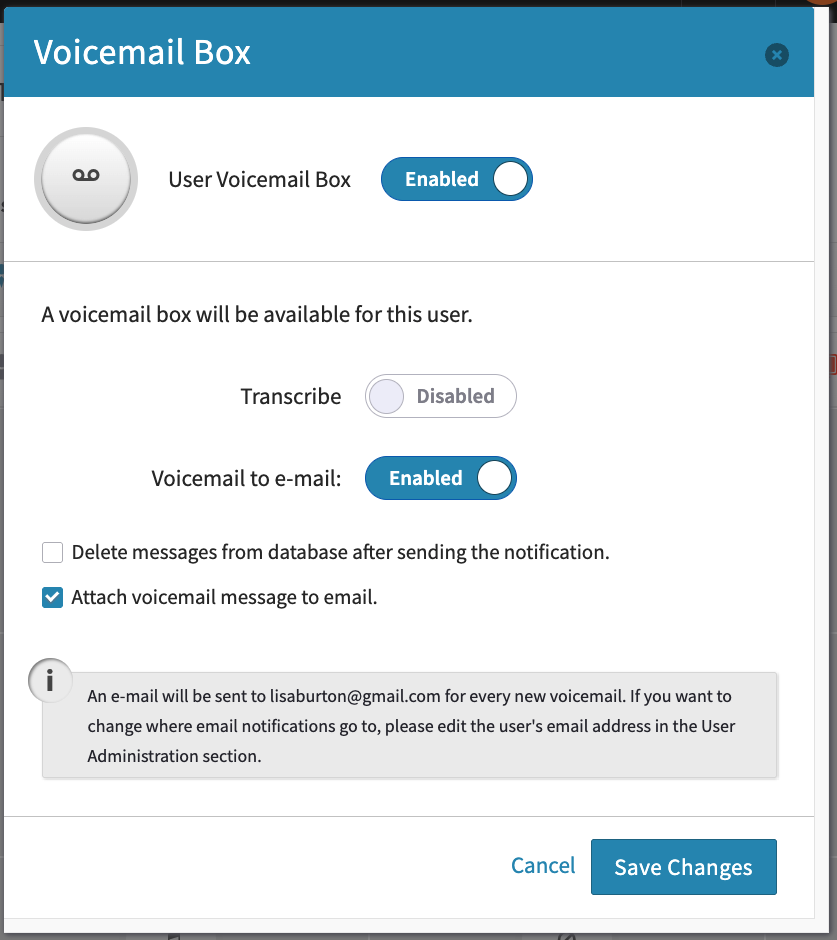
Utilize this page to manage voicemail transcriptions, and where your voicemails will be sent when left.
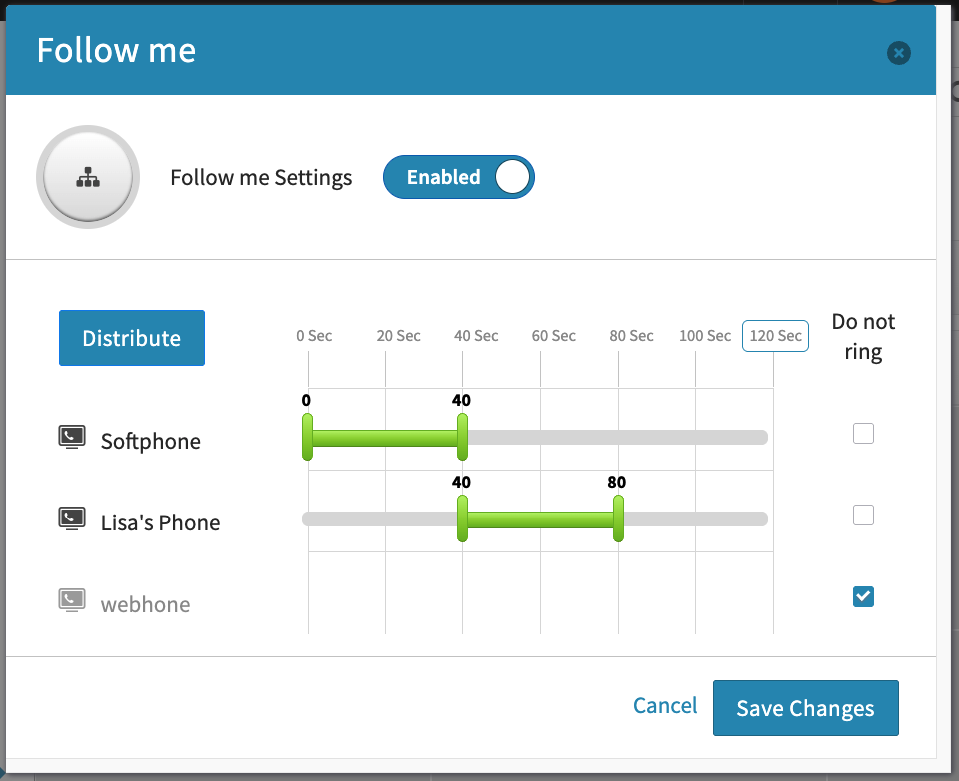
3. Follow Me
Utilize this feature to set up call distribution. Turn on which devices you would like to ring, and set the ring duration for each device.
4. Faxbox
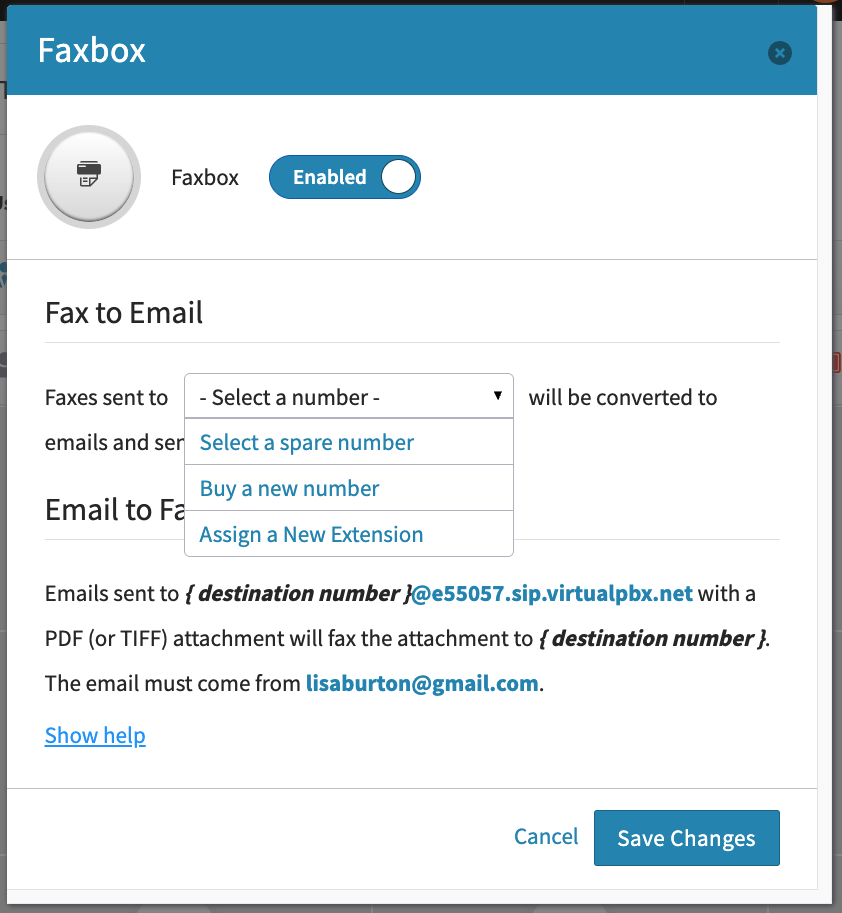
If you want your user to be able to send and receive faxes: Select a number to use for sending and receiving faxes. You can choose from spare numbers on the account, or buying a new number. Once a number is chosen, click on Save Changes
If you only want your user to receive faxes: Assign a new extension. You will not be able to send faxes from this faxbox, as sending a fax requires Caller-ID information. You will need to create a new extension (not one assigned to a user or ring group previously).
Your user will need to inform the person faxing of their new extension. Once dialing the main number, this person can enter the new extension, which will then route to the faxbox. Please note - you will need to have your incoming call handling set up with a Virtual Receptionist for people to dial an extension.
5. Conference Bridge
A main conference number will need to be added on the account before enabling for specific users. Once this number has been enabled, turn on the feature on a user label, and create a pin number.
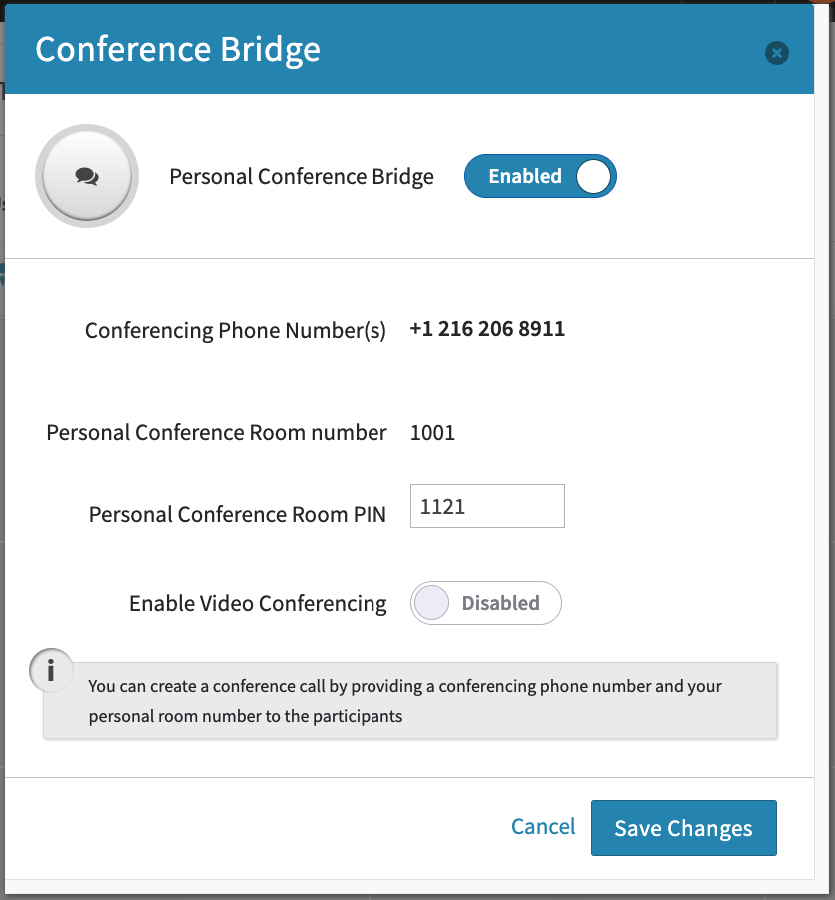
To join a Conference simply dial the Main Conference phone number -
Enter the Conference Room number followed by the # key.
Enter the Conference Room PIN followed by the # key.
When a user’s conference room is in use the user will still be able to receive a call on their VoIP phone. This call can either be DID, Extension call, Menu option to the user or ring group or to directly to a ring group itself.
Calls that are answered by a user using a VoIP phone can be added to the existing conference call if so desired.
The user, using a VoIP phone, can swap between the conference call and the call to the user if needed.
Conferencing using a Cell or Landline “only” on that user will not interrupt the conference call nor will it prevent a call from going to that device.
Users can manage their conference via the User Portal.
6. Call Forwarding
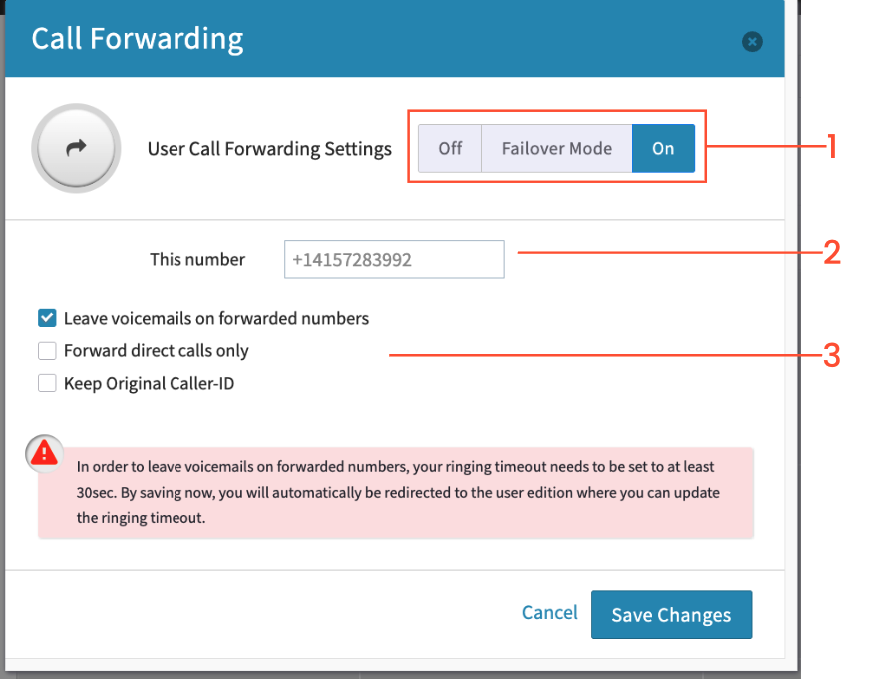
Click Failover Mode to automatically enable if VoIP phones should lose connection. Click On to enable call forwarding, bypassing VoIP phones on the user.
Enter the area code and phone number you wish to forward to, starting with +1, ie +14086745541 will forward to 4086745541
Select any options that you wish
7. Music on Hold
Upload an audio file that will play when your user places a call on hold. Files will need to be in mp3 or WAV. format, and will need to be under one megabyte.
8. Do Not Disturb
Turn this feature on to place your user on Do Not Disturb mode, stopping calls from coming to the user chosen.
9. Hot-Desking
Hot Desking allows a user to to use any phone on the account by entering their Hot Desk ID and password if required. This allows them flexible phone access, which is especially useful for employees who split their time in various workplaces.
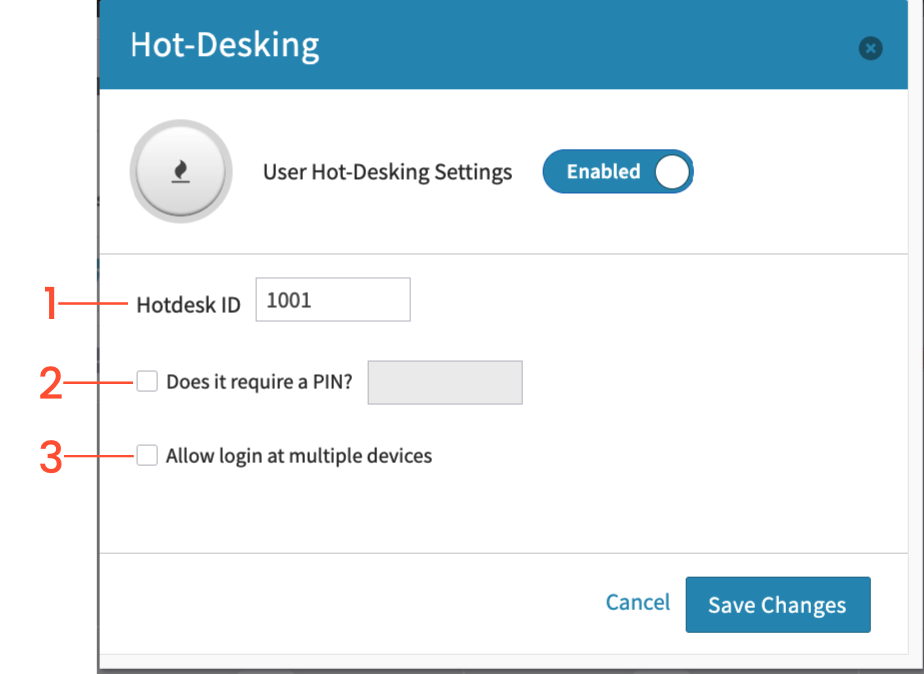
Once Hot Desking is enabled, enter the Hot-Desk ID number for the user.
You may also set a PIN number but it is not required
“Allow multiple devices.” When this is checked, the user may log into multiple devices at the same time.
Disable Hot Desking 12 This User Feature Code allows you to log-out of a phone. Just as logging into the phone, once a user has entered their ID and optional pin, the phone will cease to receive their inbound calls, voicemail updates, and other features. Inbound calls will likely go straight to voicemail (unless the user is permitted to be logged into multiple phones at once). To disable:Dial *12 from the phone
The system will prompt to enter your Hot Desk ID (numeric code)
If the user has a PIN configured, there will be a voice prompt requesting the PIN. Enter it, followed by #
You will hear a confirmation that Hot Desking has been disabled.
Toggle Hot Desking 13 This User Feature Code allows you to toggle the current state of the user's devices. If logged out, toggling logs the user into owned devices. If logged in, toggling logs the user out of all the devices they're logged into, and vice versa.Dial *13 from the phone
The system will prompt to enter your Hot Desk ID (numeric code)
If the user has a PIN configured, there will be a voice prompt requesting the PIN. Enter it, followed by #
You will hear a confirmation that Hot Desking has been enabled/ disabled.
Upload an audio file that will play when your user places a call on hold. Files will need to be in mp3 or WAV. format, and will need to be under one megabyte.
Extensions
Extensions are a shorter direct way to reach a specific agent or group. You can utilize multiple extensions on the same user.
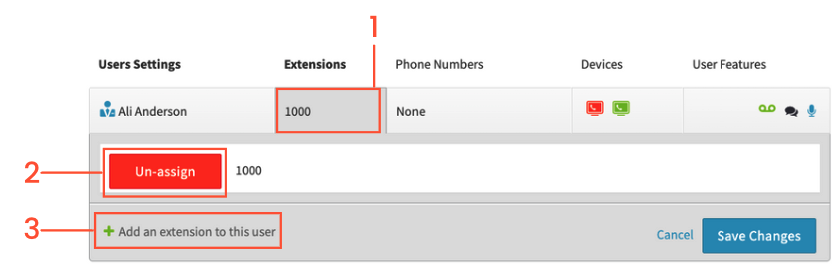
Click on the Extensions tab on your user
Un-assign specific extensions if you do not want them on the user
Add a new extension
Afterwards, make sure to click Save Changes
Direct Number
Adding a direct number to your user will allow customers/clients to route directly to the user instead of going through your set incoming call handling for your main number.
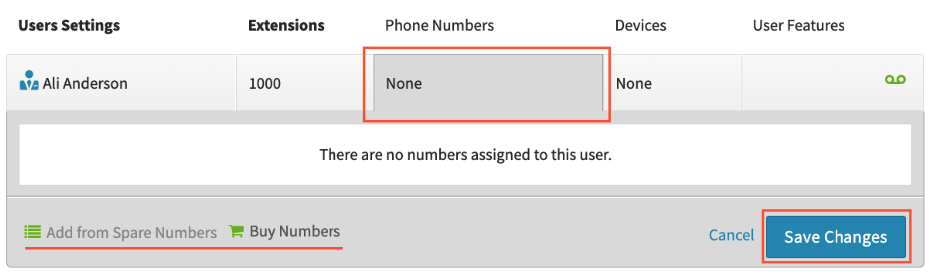
Click on the phone numbers tab for your user, from here you can buy a number, or add a spare number you already have. Note - Each user on your account is entitled to one local number.
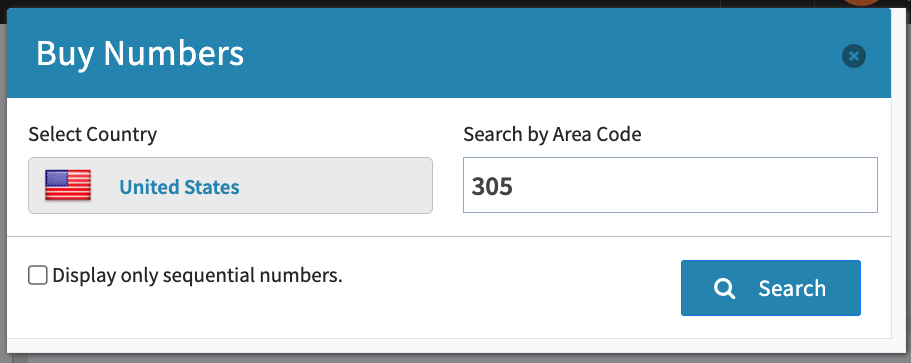
Buying a Number - Choose either a toll-free or local number.
For local numbers, choose the area code to search by. You can also choose to display only sequential numbers.
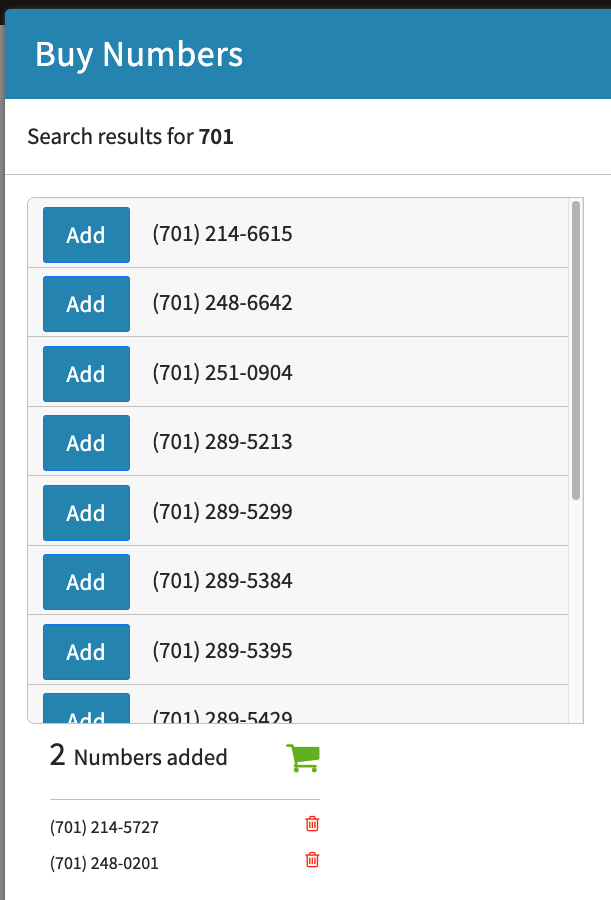
Add which numbers you would like to purchase, scroll down, and choose ‘Buy Numbers’
For Toll-Free numbers, you will be able to choose from a set toll-free prefix.
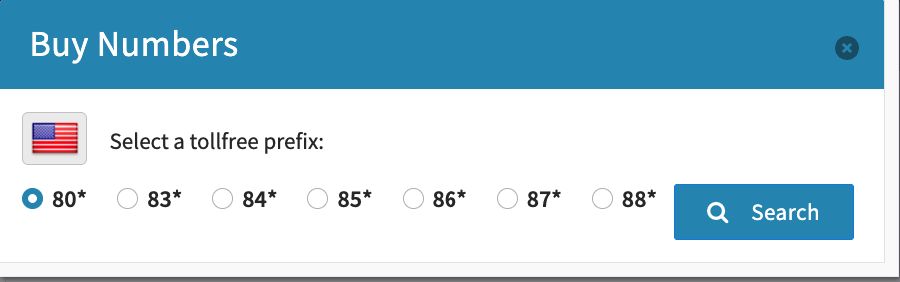
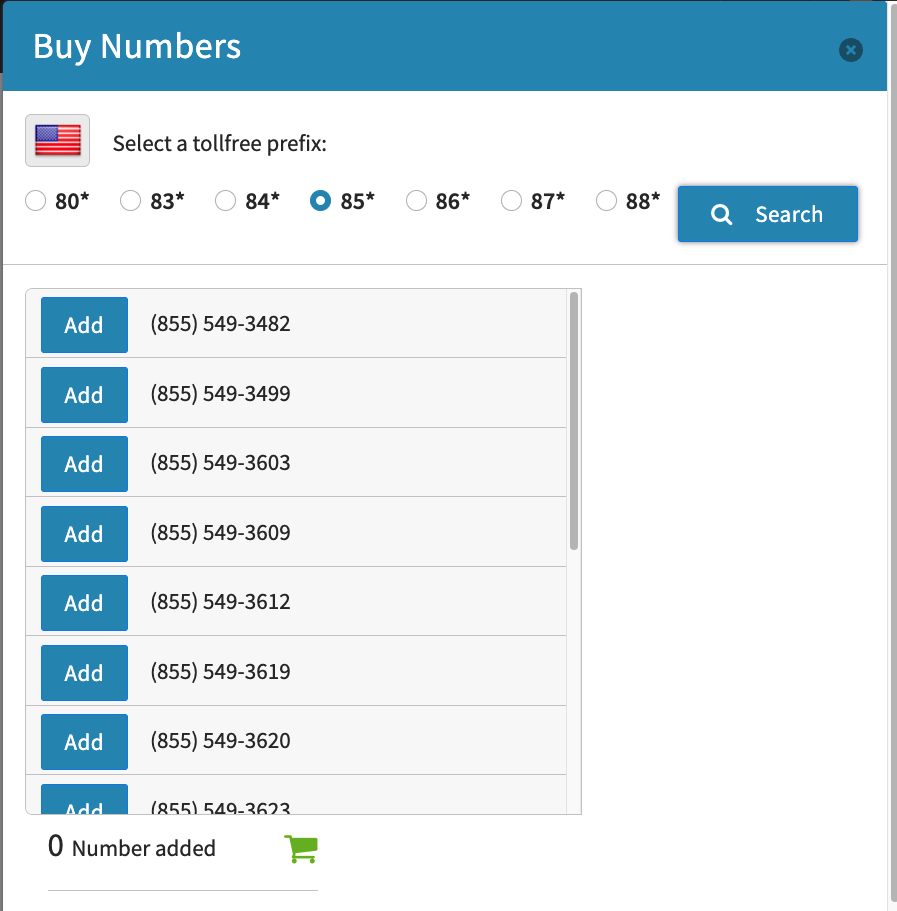
Add which numbers you would like to purchase and choose ‘Buy Numbers’ at the bottom of your screen.
Once the number has been purchased, you can set up Caller-ID, e911, Prepend, and sync for your user.
To edit these features, click on the cog on the right hand side of your number
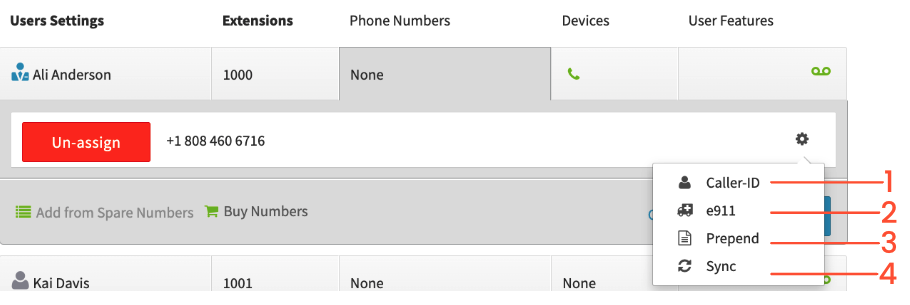
1. Caller-ID
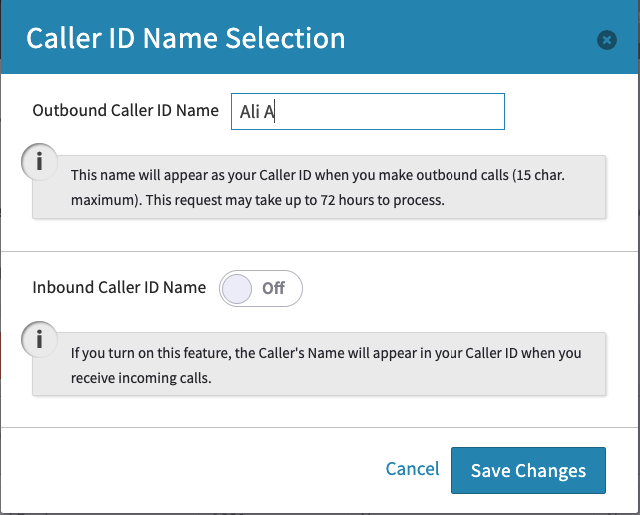
Your Caller ID will appear when making outbound calls, and has a maximum character limit of 15. You can also turn on the Inbound Caller ID to allow you to see what a caller dialing in to speak with you has set as theirs
2. e911
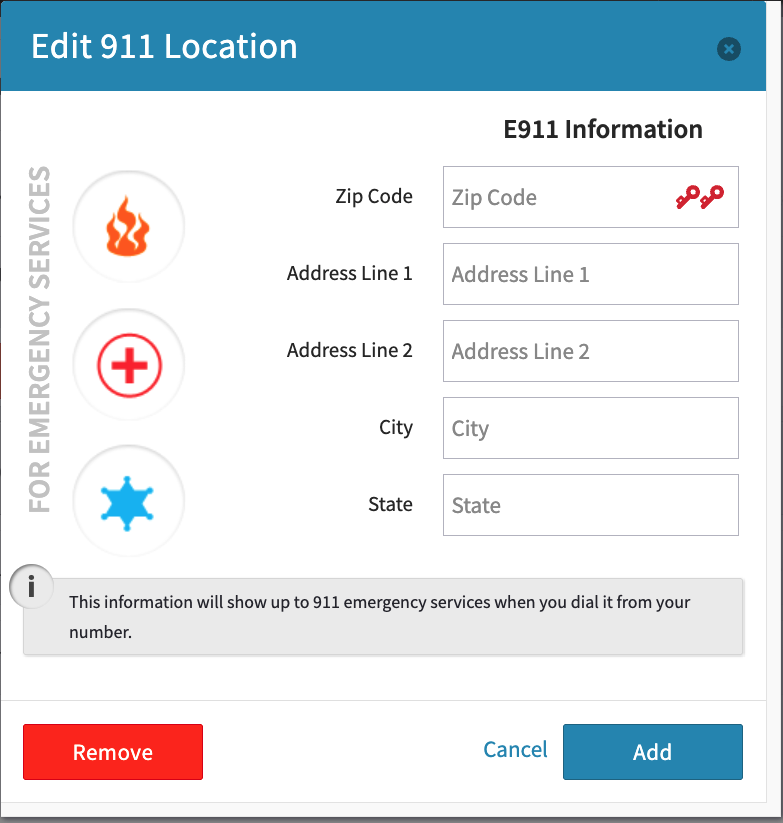
This filled out address will appear to 911 emergency services, should you have to dial it from your VirtualPBX VoIP device
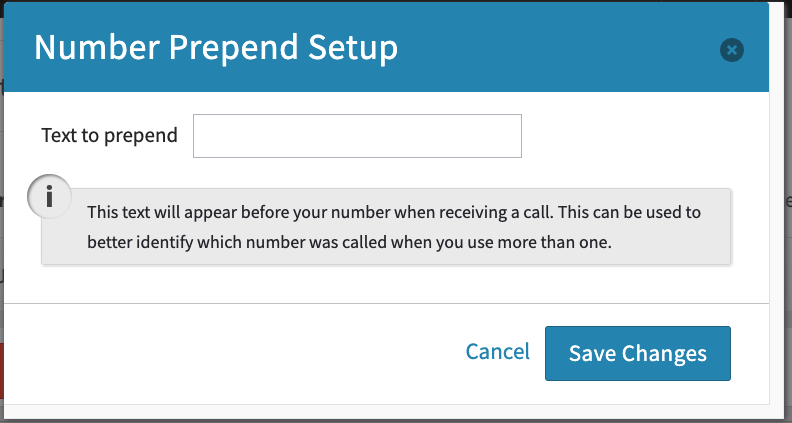
3. Prepend
Utilize prepends to identify which number is being called by filling this out. This can be helpful for agents that have specific numbers for separate departments (I.e. Sales, Accounting, Internal)
4. Sync
When chosen, this will sync your number with your account.
Add Devices
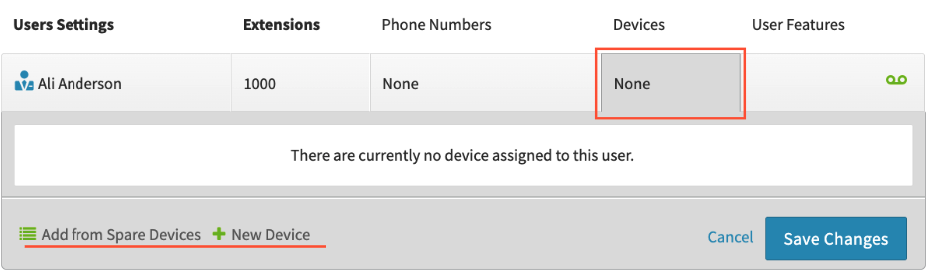
There are two ways to add a device to a user.
We generally recommend doing so from the “Users” menu by clicking the above and selecting “New Device”, and our instructions below will follow that method
However, you can also add them in the “Devices” menu, and then come to the users section and clicking the above and selecting “Add from Spare Devices”
There are various devices you can create for your users to utilize to make and receive phone calls either through your main company number or their personal number. Click on the devices tab, from here you can add from spare devices, or add a new device.
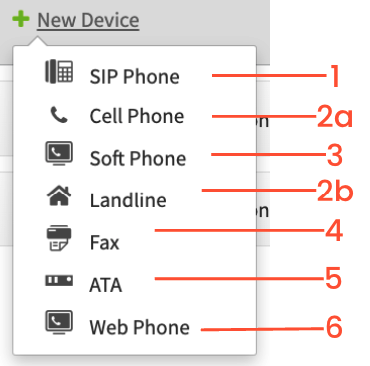
1. SIP Phone
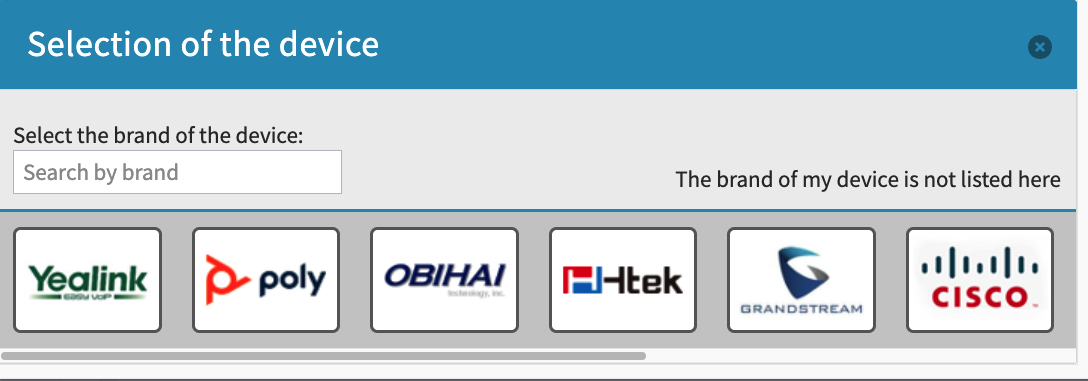
Once you choose the SIP option, you will be able to choose your device first by the brand, then by the model of the device. If the brand of your device is not listed, choose the above option and enter the MAC address and name your device.
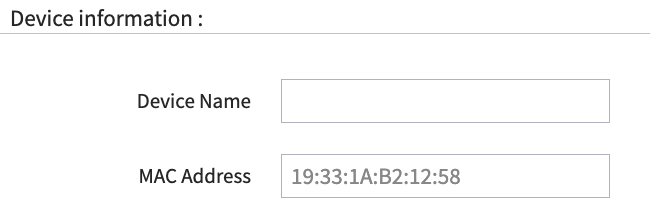
Once you have entered your information, choose ‘Create Device’
IF THIS IS A NEW DEVICE - Once you have created the device, click in to the device name, and choose ‘Advanced - Miscellaneous’.
Unlock the device, then unplug your phone, wait 2-5 minutes, and plug back in.
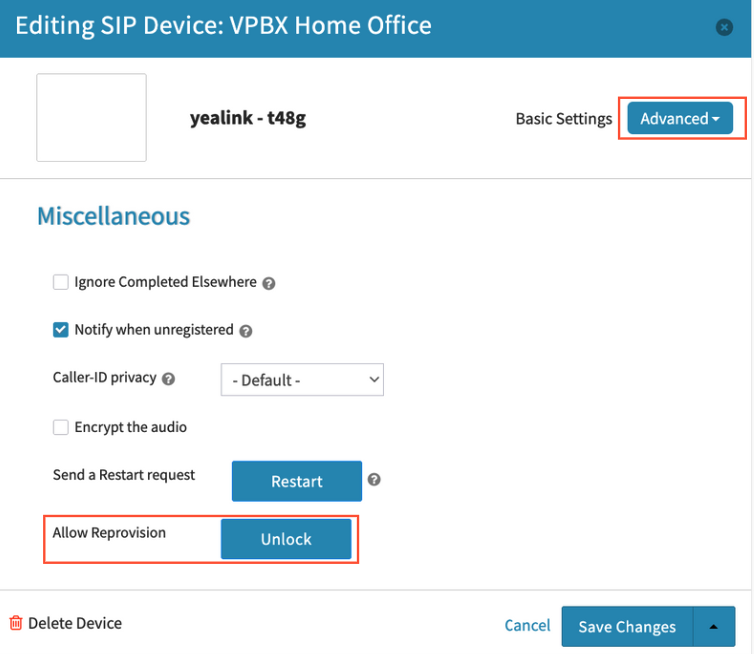
IF THIS IS A DEVICE USED BEFORE - Factory reset your device before creating it on the system here.
2. Cell Phone or Landline
Adding a cell phone or landline allows for use of receiving calls from your business number to any 10 digit (Or international number if you’re qualified for that) number, be that your cell phone or an outside number of some kind. Please note that to make outbound calls through your system, you would need to use a VOIP device, like a Web Phone, Softphone, or SIP desk phone.
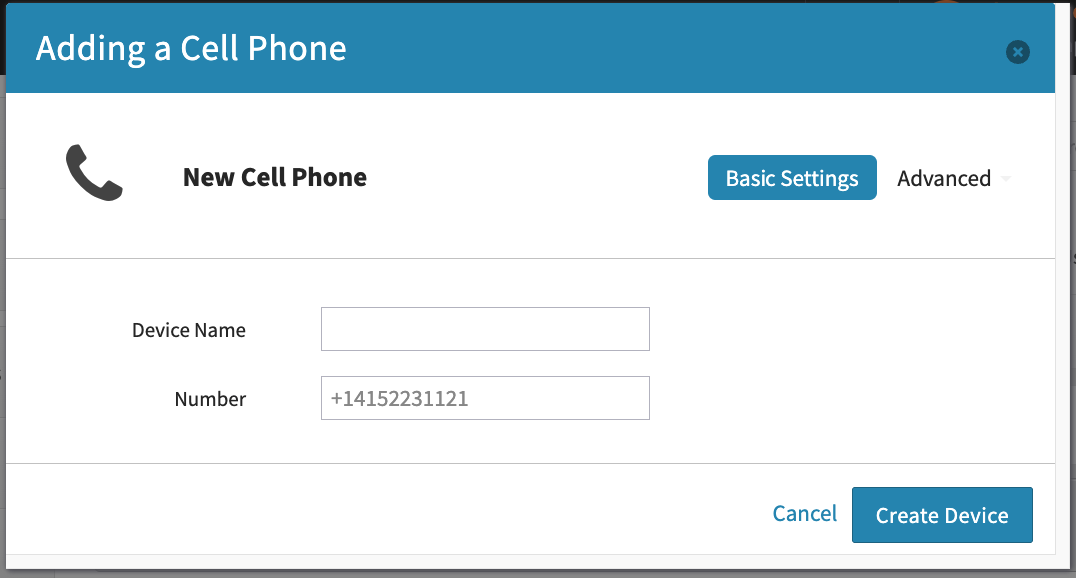
Give the device a name (this will only be used to internally track devices) and add your phone number. Follow the format given, beginning the number with a +1 (For normal 10 digit numbers).
Additional options for Cell phones and Landlines
You can edit the Advanced options for a Cell phone or Landline. There are two ways to get there.
Users - user’s device box, click the device’s name
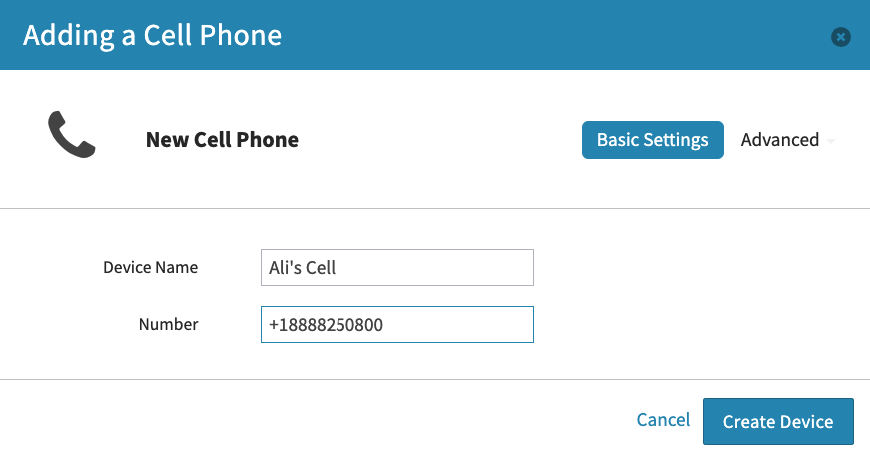
Click on Advanced
Click on Options
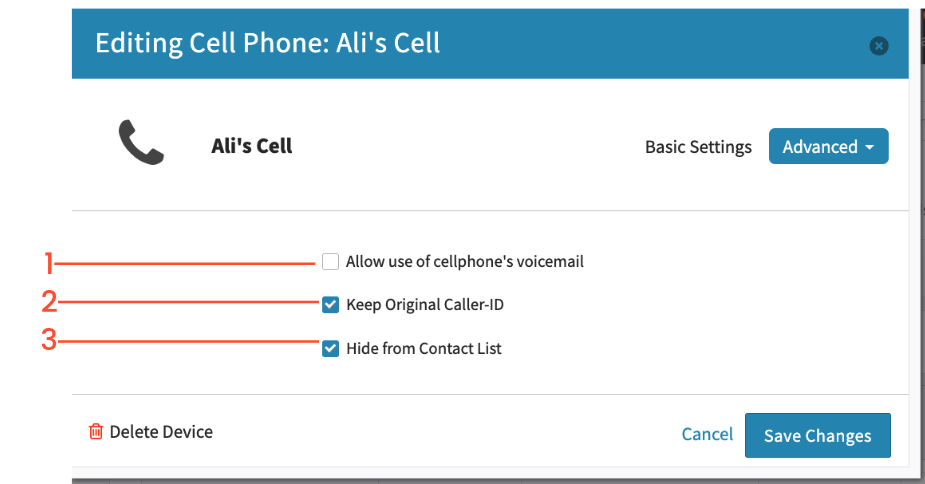
Allow use of cellphone voicemail: When enabled, cell users no longer will be prompted to press 1 to answer a call. However if your cell phone voicemail picks up the call before the VPBX ring duration for the device ends, the inbound caller will end up in your cell phone’s voicemail box. Please lower the ring duration in VirtualPBX if this is happening to you unintentionally. This feature is also often used when sending calls to an automated answering service.
Keep Original Caller-ID: When checked the Caller ID that shows up on your cell phone is the inbound caller’s phone number. If unchecked, the Caller ID that shows up on your cell phone will be the default Company Caller ID
Hide from Contact List: When selected the phone number will not show up in the Contact list. If unchecked, then the phone number will appear in the Contact list
If you make any changes, click on Save Changes
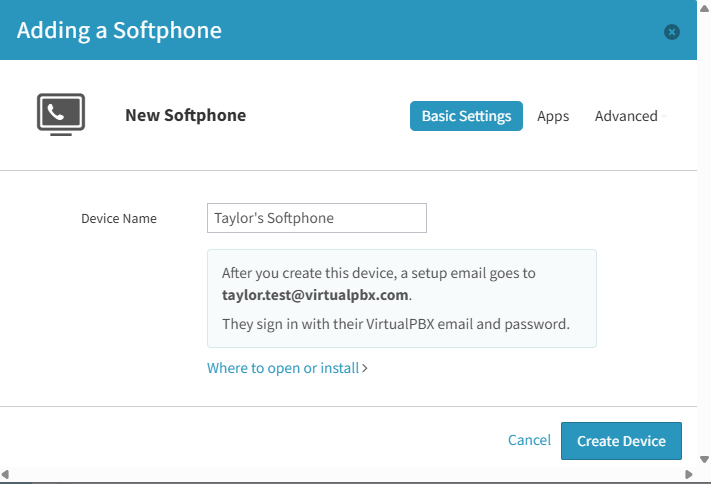
3. Softphone
A Softphone is the VirtualPBX app that will allow you to make and receive calls through your business number. You will also be able to utilize features usually seen on a deskphone.
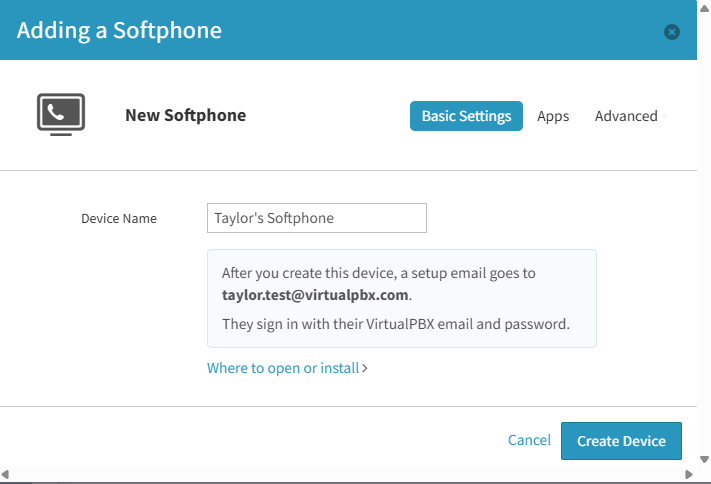
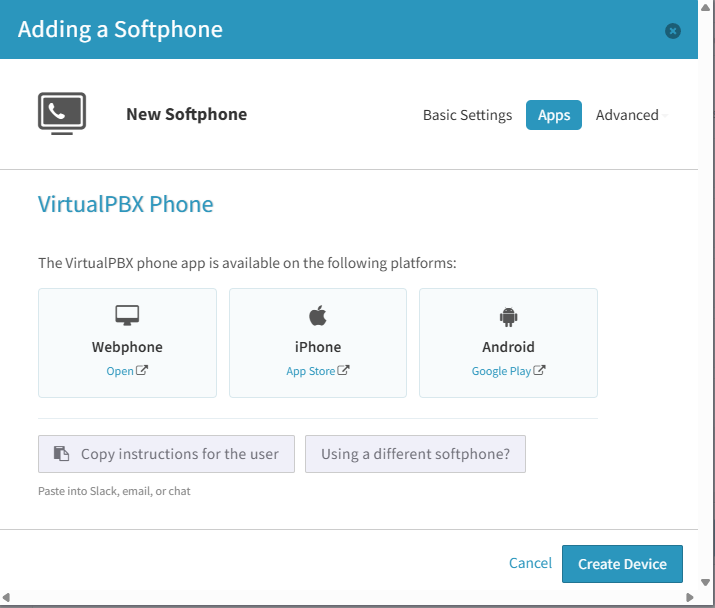
You can click on the “Apps” tab in order to find the download links for the new Softphone for your specific platform.
Enter a device name to identify your new Softphone. Once done, click ‘Create Device’. Once out of the page, make sure to hit ‘Save Changes’ on your user’s device page.
4. Fax
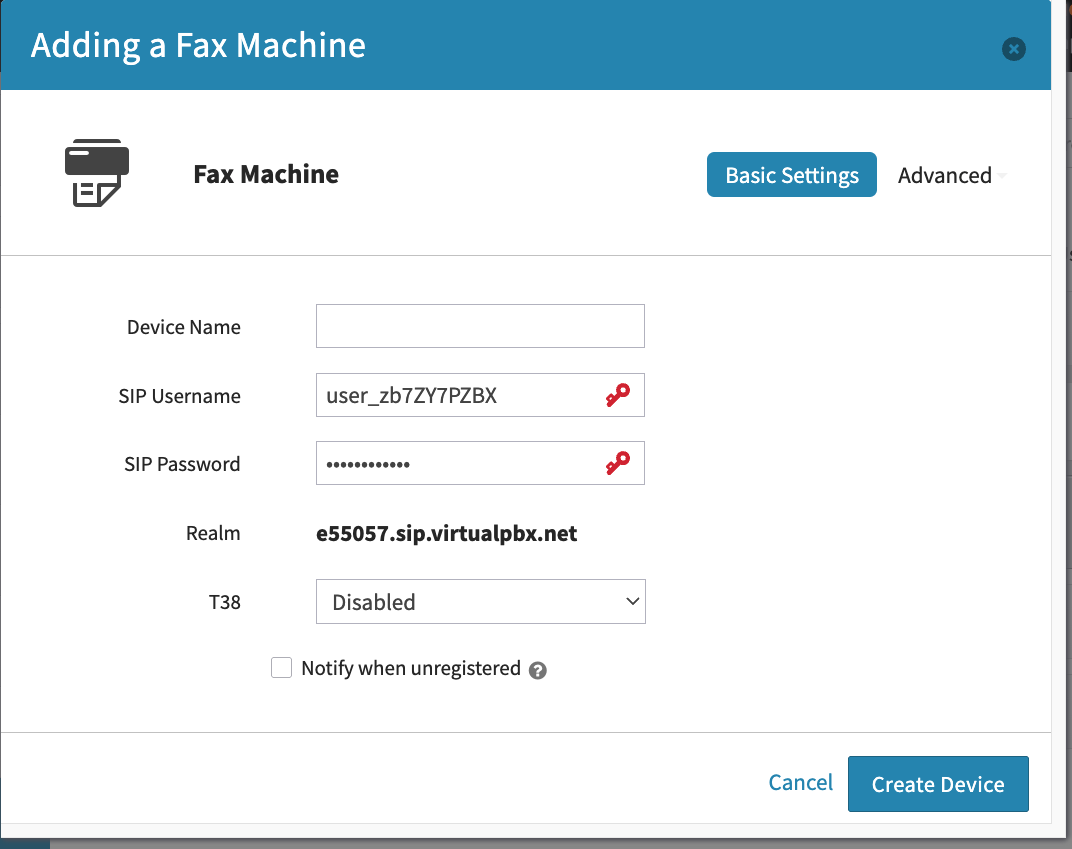
This device is a SIP fax machine, and will allow you to link it in the system. You will need to have the device on your end, and most provisioning will take place through the machine’s site. Get all information needed for your fax machine’s website through choosing ‘Fax’
5. ATA
An ATA adaptor is a converter box that allows you to use an analog phone/fax machine via your internet connection. On one side you plug in the analog device, on the other is a network cable that will go to your router. Utilize this option for an analog fax machine.
Device Name: This is the name of the device that will show up in your Dashboard. It does not affect any part of provisioning or your system functionality.
SIP Username: This is a system-generated username that will be used to input into your ATA device’s web interface. Please avoid changing this item in the Dashboard to avoid complications with provisioning and registration.
SIP username is often entered into fields such as: User ID / Account name / Authentication name or ID / Authorization name / SIP User ID
SIP Password: This is a system-generated username that will be used to input into your ATA device’s web interface. Please avoid changing this item in the Dashboard to avoid complications with provisioning and registration.
SIP Password is often entered into fields such as: Password / account password / authentication password / SIP password
Realm: This is a system-generated string unique to your VirtualPBX account which will be input into your ATA device’s web interface
Realm is often entered into fields such as: Domain / Server / Proxy or Proxy Server / Register server / SIP domain or Server
It is possible that you may need to setup the Outbound Proxy server as well
Outbound Proxy should be set to proxy-west.virtualpbx.net
Mouse over Advanced and you will see your Advanced options. In general these can be adjusted as you see fit or simply left as is.
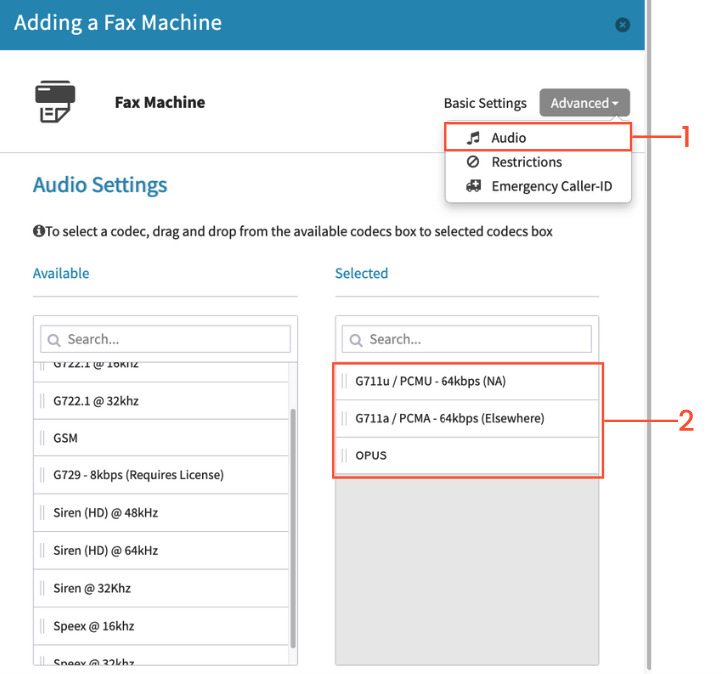
1: Click on Advanced in the top right, and select “Audio”
2: Move the following options from the left column to the right column in descending order: PCMU / PCMA / OPUS
Click on Create Device when done.
Third Party Credentials
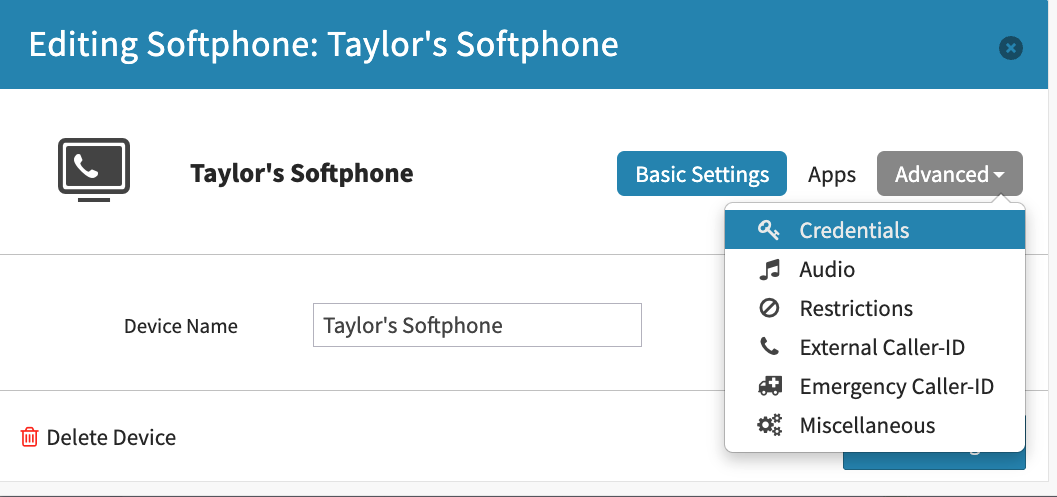
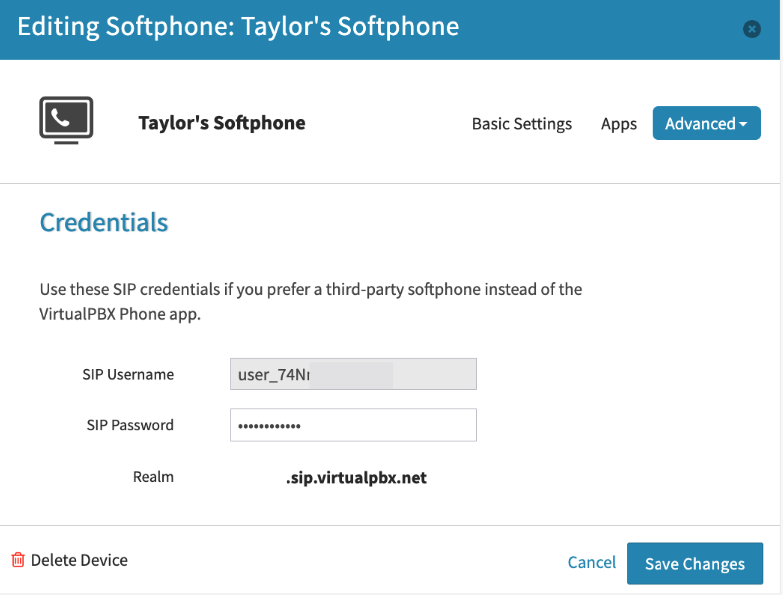
You may be utilizing a third party device that will require credentials through us to log in. To do so, create a Softphone firstly
Once created, click on ‘Advanced’ and choose ‘Credentials’ to grab the credentials needed
Deleting a Device
You must be logged in as a system administrator in order to delete devices.
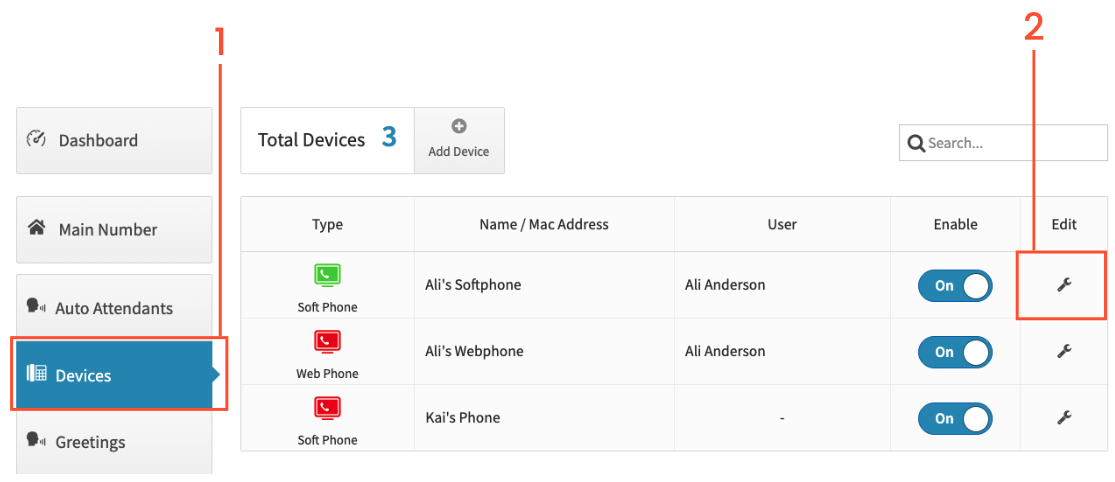
On the left click on Devices
Click on the wrench icon to the right of the device you want to delete
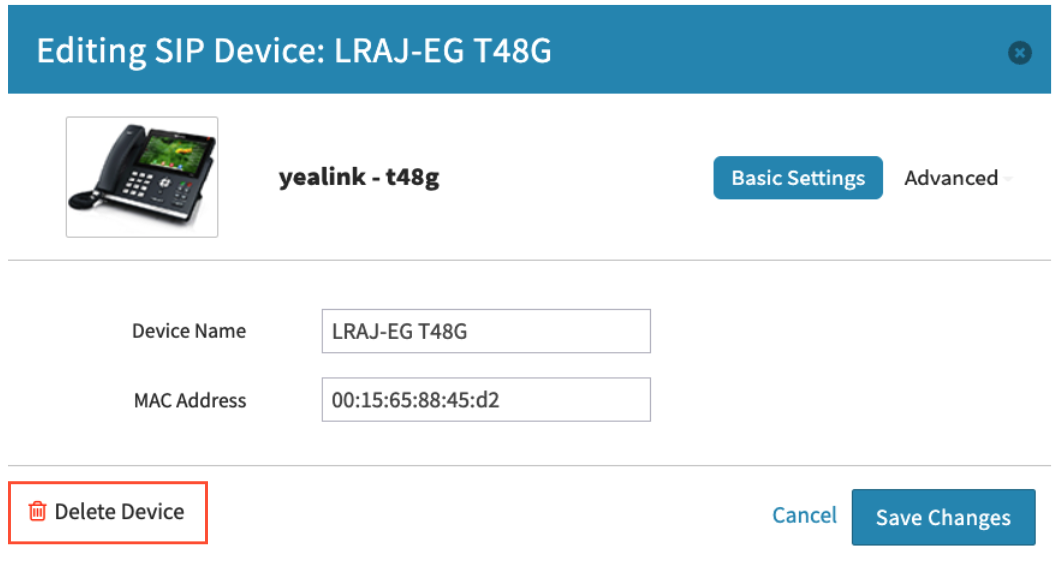
Click on Delete Device on the lower left
Click on Ok to confirm the deletion
Alternatively, you can start on the user’s tab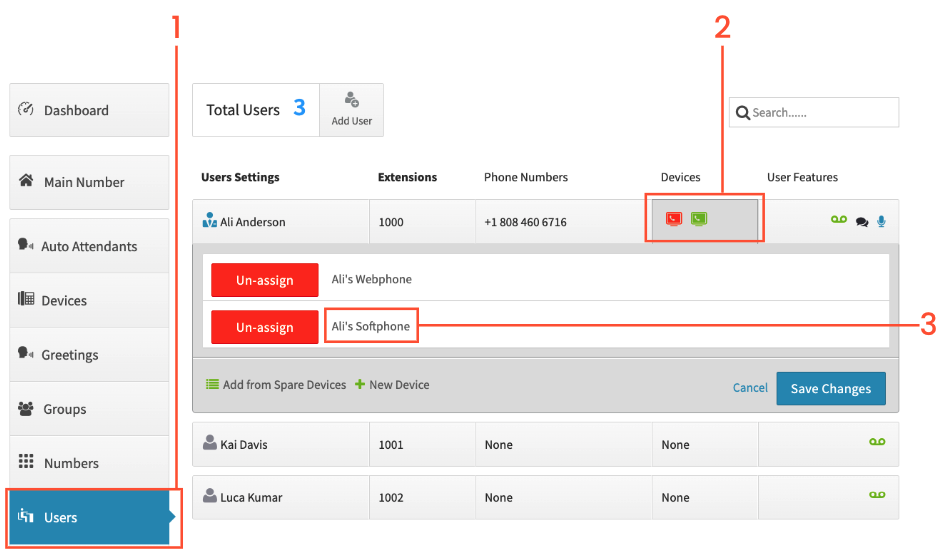
Click on the Users tab
Click on the device box to the right of the user’s name
In the expanded box, click on the device’s name
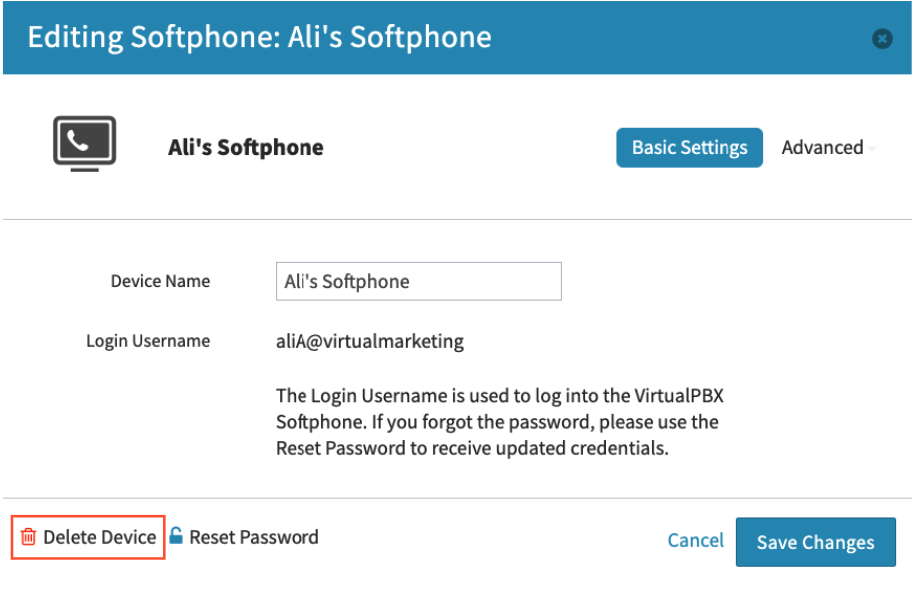
Click on Delete Device on the lower left
Click on OK to confirm the deletion
Check out our support FAQ for VoIP Devices!
Create Groups
Ring Groups allow multiple users on the system to get offered the same call. Phones can ring simultaneously, overlapped, or in series. (For example, a sales department being able to have all agents receive the call)
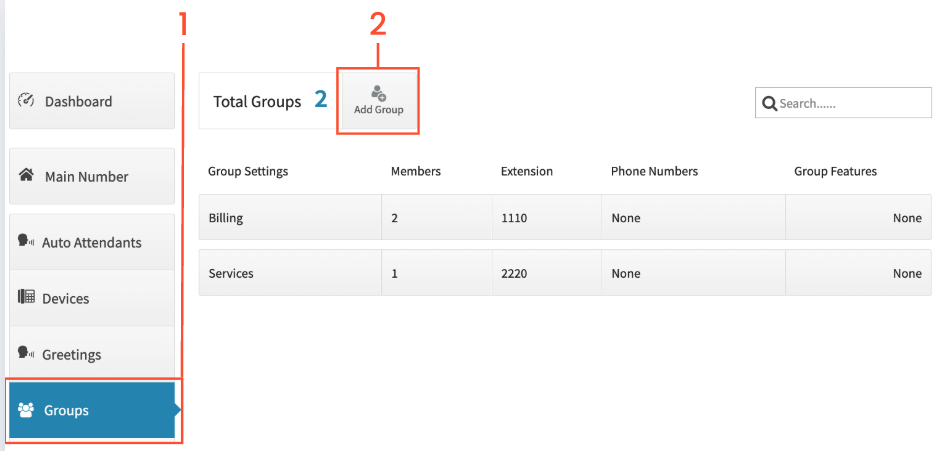
To create a ring group, start by selecting Ring Groups in the Dashboard.
Click the Add Group button.
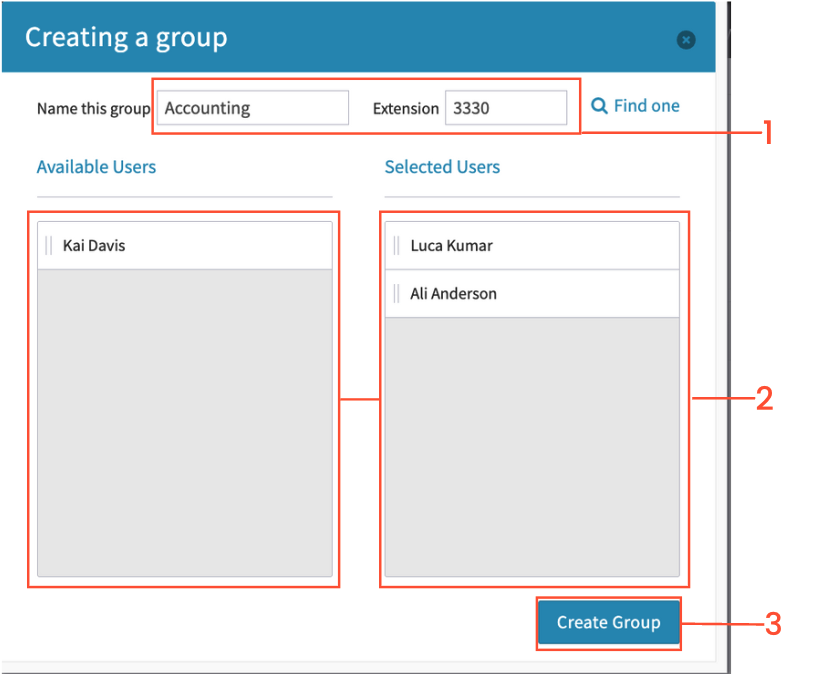
Fill in the Group Name and give the group an extension number. Note: The extension number of a Ring Group cannot match the extension number for a user or a voicemail box.
Drag and drop the Users from the “Available Users” column to the “Selected Users” column that you want to be a part of the Ring Group
Click on Create Group when you’re finished.
Ring Group Ring Duration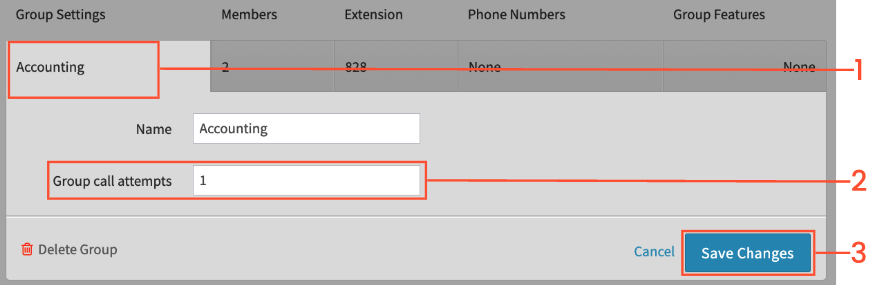
Click on the name of the group you just created.
You will see an option for Group Call Attempts. This is the number of times a caller will ring to the members of the group before the Next Action feature will take effect. Mouse over the Group Call box and use the up/down arrows or enter the number of rings you prefer (1-9).
Click “Save Changes” after you are finished to save the configuration.
Ring Group Distribution Options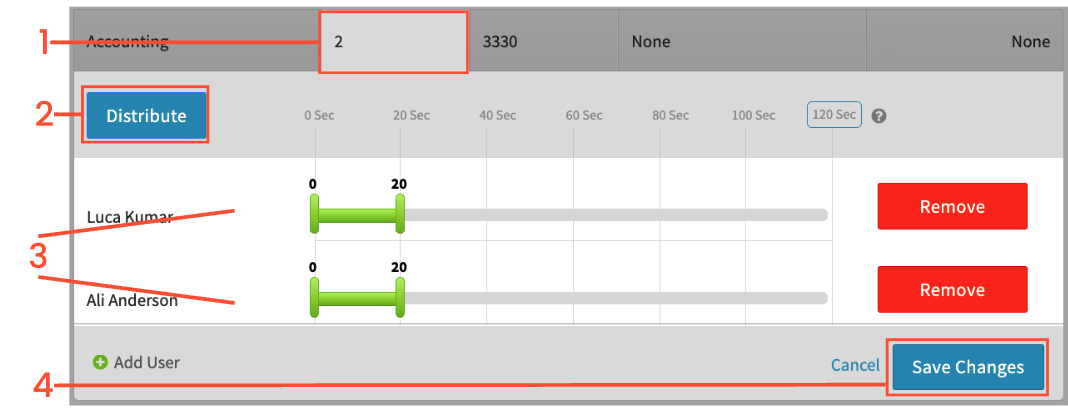
Under Groups, click on the “Members” column to open up the distribution options for your agents.
Here you have the option of automatically distributing ring durations; this will automatically adjust the sliders so each user rings one after another.
The sliders are the manual distribution option for the agents - You may adjust these as you like, and can have multiple users with the same ring distribution in order to have them ring simultaneously in the group.
Click “Save Changes” once you are happy with the time and order that the calls are supposed to ring your agents.
Dedicated Phone Number
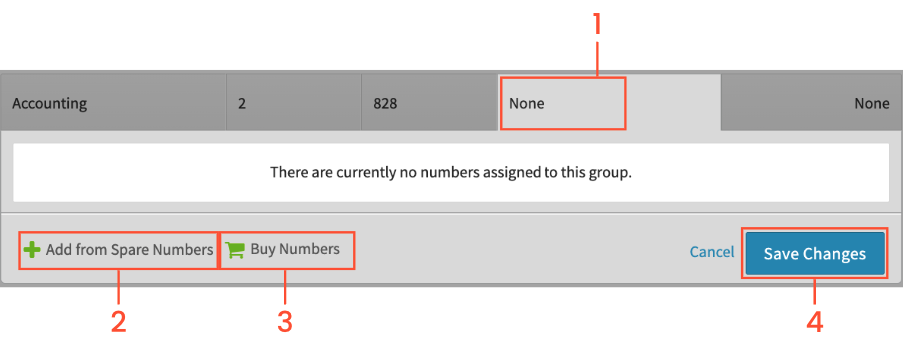
If you would like your group to have a direct phone number, you can add one by clicking on the “Phone Numbers” column under groups.
If you have extra numbers on the system already, you can select “Add from Spare Numbers” to select the number you wish to add.
If you need to buy a number, you can select “Buy Numbers”, choose a local or Toll-free, and add the number to the group.
Click “Save Changes” once you are finished to complete adding the number to the group.
Optional Ring Group Features
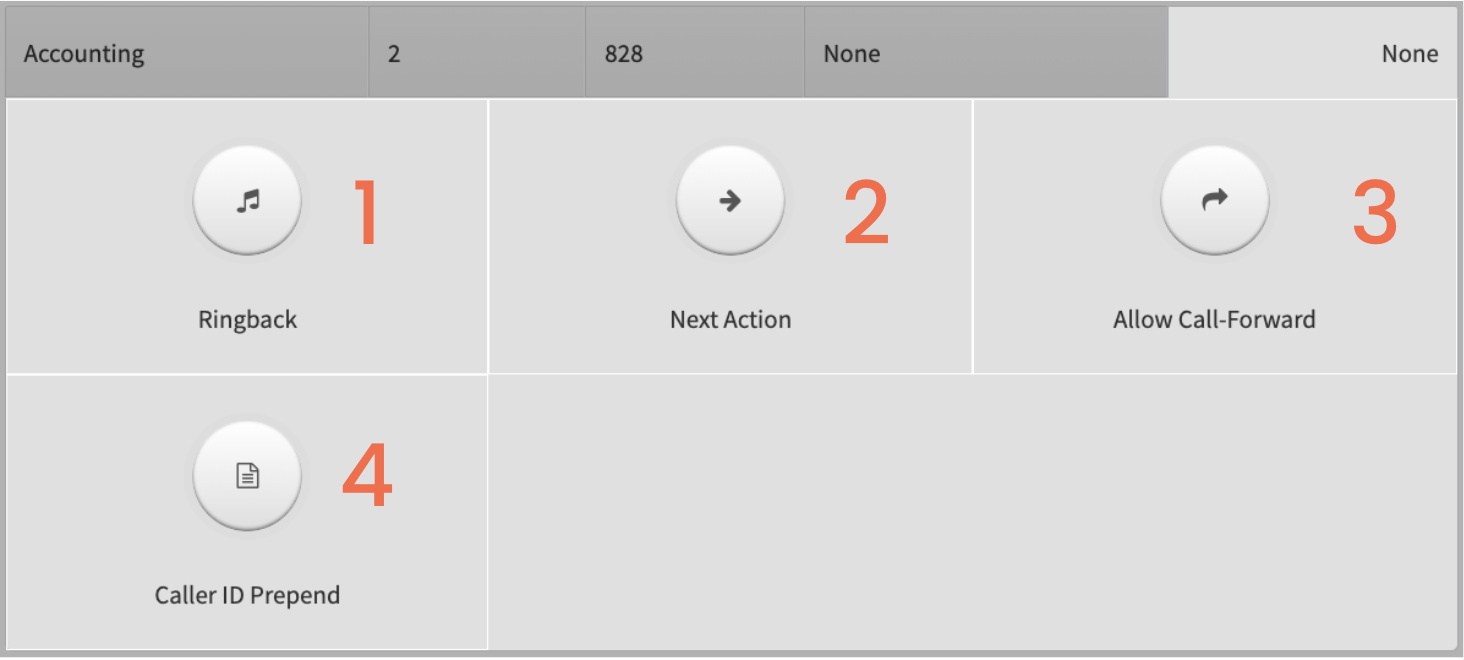
Ringback allows you to have on-hold music or a hold message play while the inbound caller is waiting to connect to a ring group
Next Action allows you to control how Dash should handle the call after the ring duration has expired or if the calls were missed; for example, sending the caller to a voicemail box.
Allow Call-Forward allows the users to press their device “Forward” button to forward a call from this ring group. To enable, click on Allow Call-Forward from the features dropdown and click on the Disabled button to change it to Enabled.
Caller ID prepend changes what your Caller ID will show when receiving calls from this group. This feature only affects the display on VOIP phones.
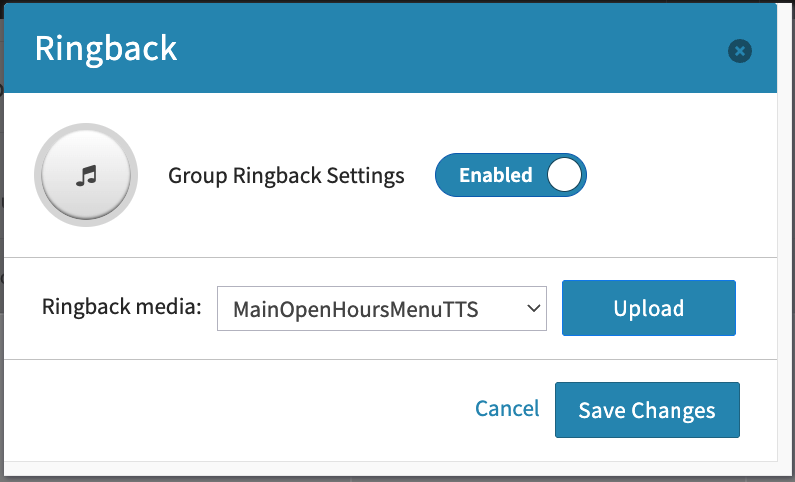
Ringback
Ringback is a feature that allows you to play media while your customer is ringing to your group. You can use this to play instructions for a customer, a greeting, or even music. Media files will need to in mp3 or Wav. format, and under one megabyte.
Next Action
Next action will dictate what happens to a call if no one in your group picks up. To assure calls are not dropped when agents do not answer, please ensure this feature is on.
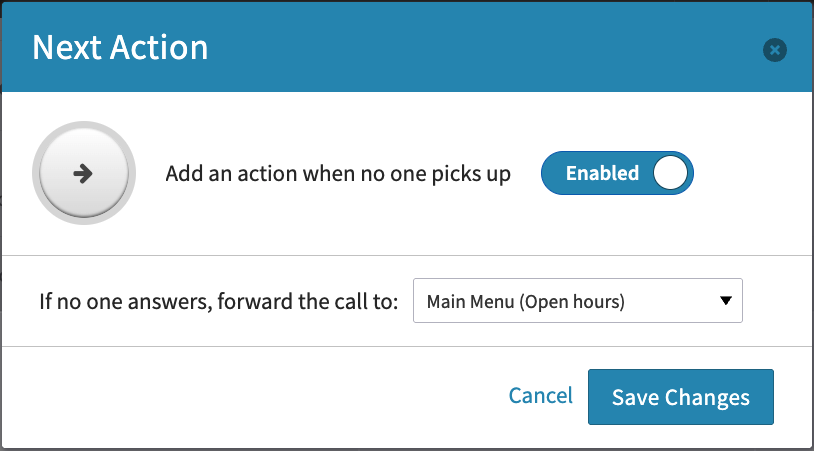
There are multiple places you can route calls to after it goes through call distribution:
Your main menu
A single user
A single device
A ring group
A voicemail box
Allow Call-Forward
Call-Forward allows your group’s users to press the ‘forward’ button on the device to forward a call originating in the ring group.
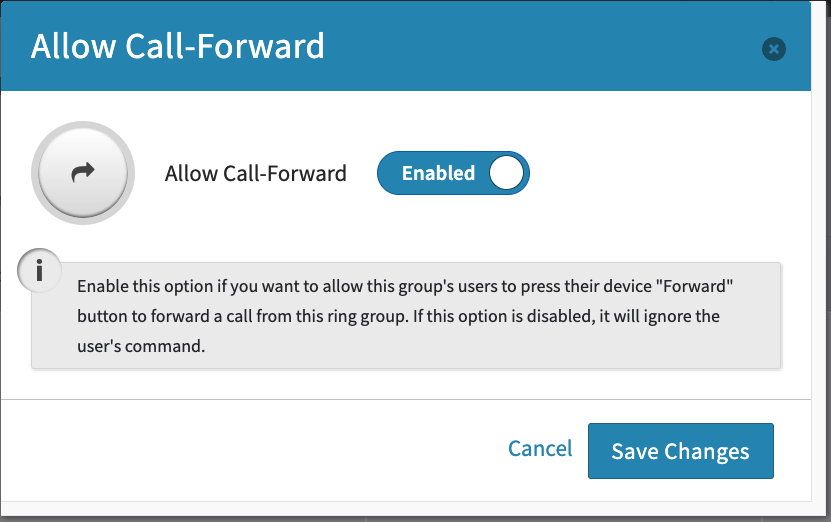
Enable the feature by flipping the toggle to “Enabled”.
Save changes after enabling the feature.
Caller ID Prepend
Prepends allow your agents to see a pre-fixed Caller ID name on their devices when rung. This can be helpful if you have an agent in multiple groups, but would like to know which specific group the customer had dialed to.
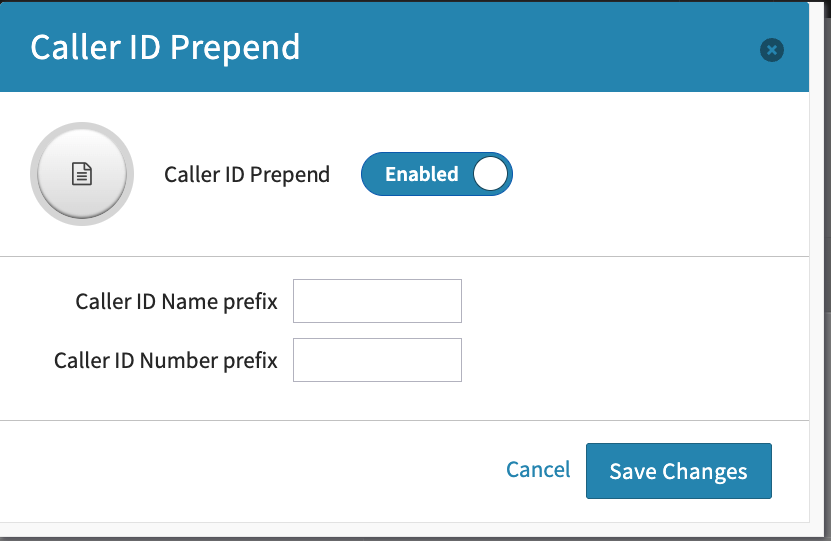
To enable, click on Caller-ID Prepend from the features dropdown and click on the Disabled button to change it to Enabled.
Caller ID Name Prefix will change the Caller ID Name that shows up when receiving a call on a VOIP phone.
Caller ID number Prefix will change the Caller ID Number that shows up when receiving a call on a VOIP phone
Click on Save Changes to save your new configuration.
Set Up Voicemails and Voicemail Boxes
Voicemail boxes can be utilized for users, groups, incoming call handling, or as a standalone option.
Manually Creating a Voicemail Box
While creating a user, you have the option to automatically create a voicemail box for them, which will link to the email address of the user. (For more information on creating users, refer to our User Creation Guide). For other options in the system such as Ring Groups or Auto Attendants, you will need to manually create a voicemail box.
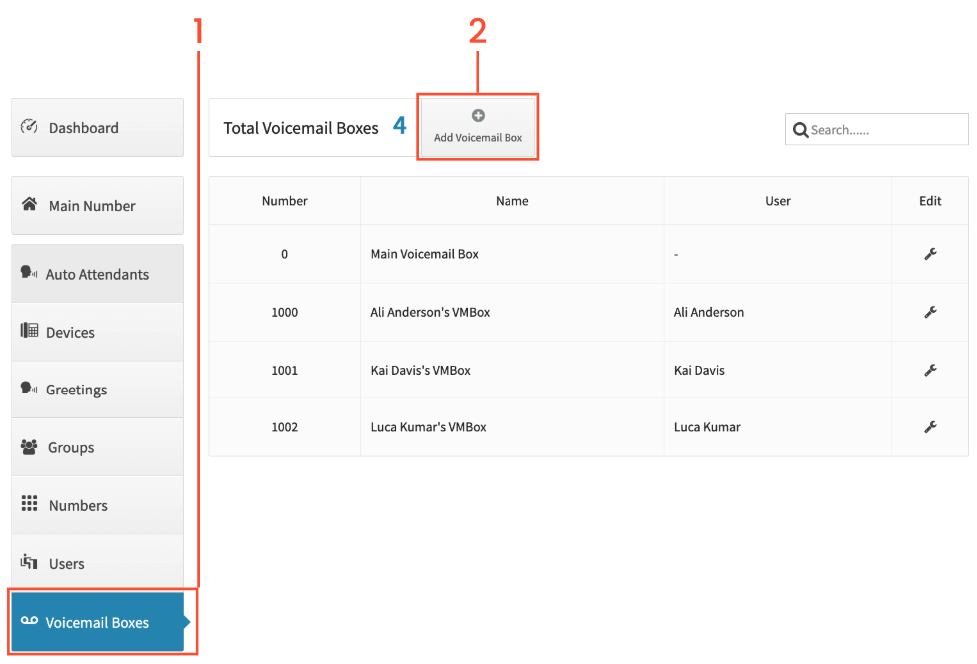
From the Dashboard click on Voicemail Boxes
Click on Add Voicemail Box
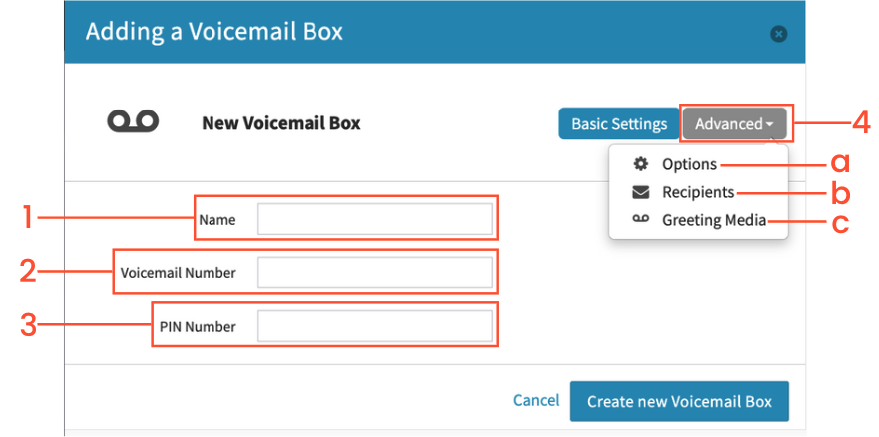
Enter the name of the new voicemail box - This is only for internal identification
Enter the voicemail box number you will use to access the voicemail box
Enter the PIN number you want to use to access the voicemail box (Optional, recommended for security)
Click on Advanced to show extra options for the voicemail box
Options
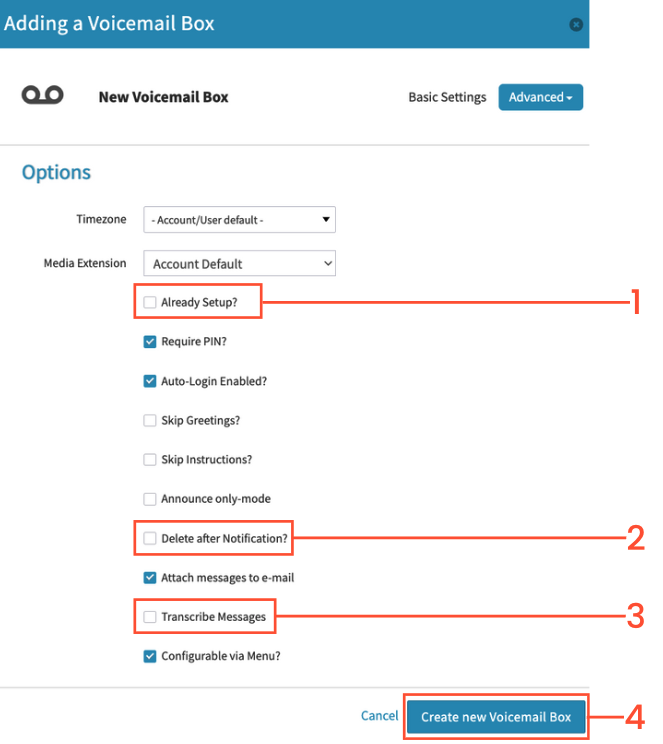
Already Setup- Make sure to check this option upon creation, this will insure voicemails are left on this voicemail box.
Delete after Notification - this is completely preferential to your account set up. Your voicemail box has the ability to store up to 100 voicemails before callers will not be able to leave messages. Checking this will delete the voicemails from the back end of your system after the voicemails have been emailed to your set recipients.
Transcribe Messages - check this to receive a transcription of your voicemails in your email of the recording.
Click “Save Changes” to confirm the changes to the voicemail box.
Recipients
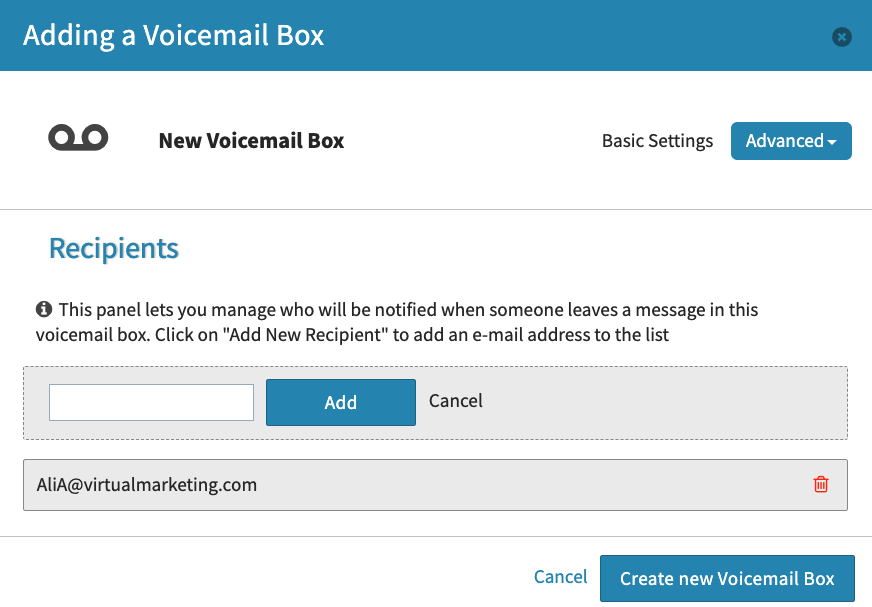
If this voicemail box was created along with a user, their email will be automatically linked to the voicemails. You can add more recipients, or make sure there is at least one if this is a stand-alone box through the Recipients page.
Greetings Media
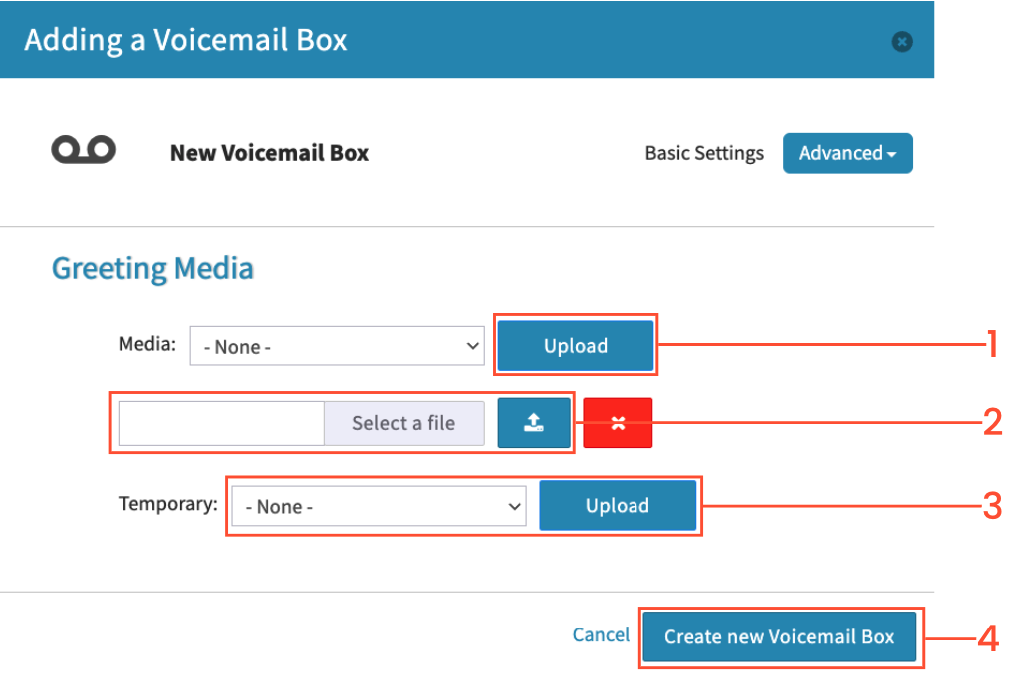
Click “Upload” to open the uploading options.
Select the file from your computer you wish to play when someone reaches the voicemail box, and click the blue ‘Upload’ button. When preparing files for use with your account, please use the following parameters: - MP3/Wav - 1 MB max file size
The Temporary option will override the file set in the “Media” option. This is usually used for the purposes of Vacation or Holidays. The file will play until it is set back to “None” and changes are saved.
Save changes once you are finished uploading / choosing your media files.
Setting Up Your Voicemail Box Using a Phone
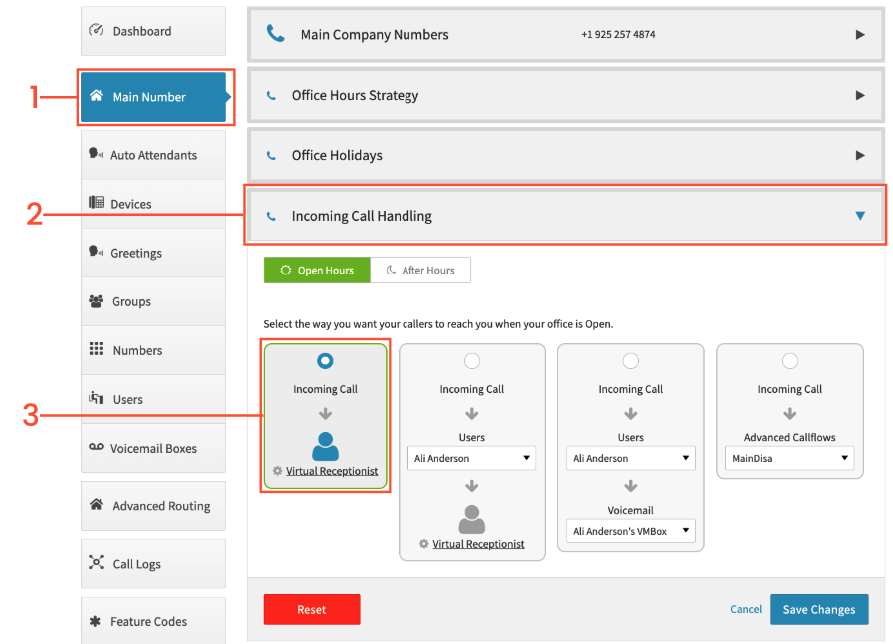
Click on Main Number
Click on Incoming Call Handling
Ensure the Incoming Call Handling is set to the Virtual Receptionist
Call your main number
Press *97
The system will prompt you to enter your extension number
The system will ask you for your current PIN
The system will prompt you to enter new PIN, twice for verification
The system will prompt to record a voicemail greeting
Press any key to end recording
Press 1 to save, press 2 to listen, press 3 to re-record
Once saved, the system will say “your mailbox has now been configured”
Press 0 to return to voicemail main menu
Press 5 at the main voicemail menu to change any settings
Retrieving Voicemail Messages
The first time you access your voicemail box, the system will prompt you to set up the voicemail box including setting up a PIN. If Smart PBX Directory is enabled on your account, you will be prompted to state your name after creating a new PIN. This will be played back for confirmation if there is more than one person meeting the criteria for the name search.
From an Auto-Provisioned VoIP Phone
Press the Message button on the phone
Enter your mailbox number followed by the # key
Enter your password/PIN followed by the # key
From a Cell Phone/Landline
Call into the main number (IF the main number should be ring to the Virtual Receptionist only)
Enter *97
Enter your message box number followed by the # key
Enter your password/PIN followed by the # key
From the Admin Dashboard
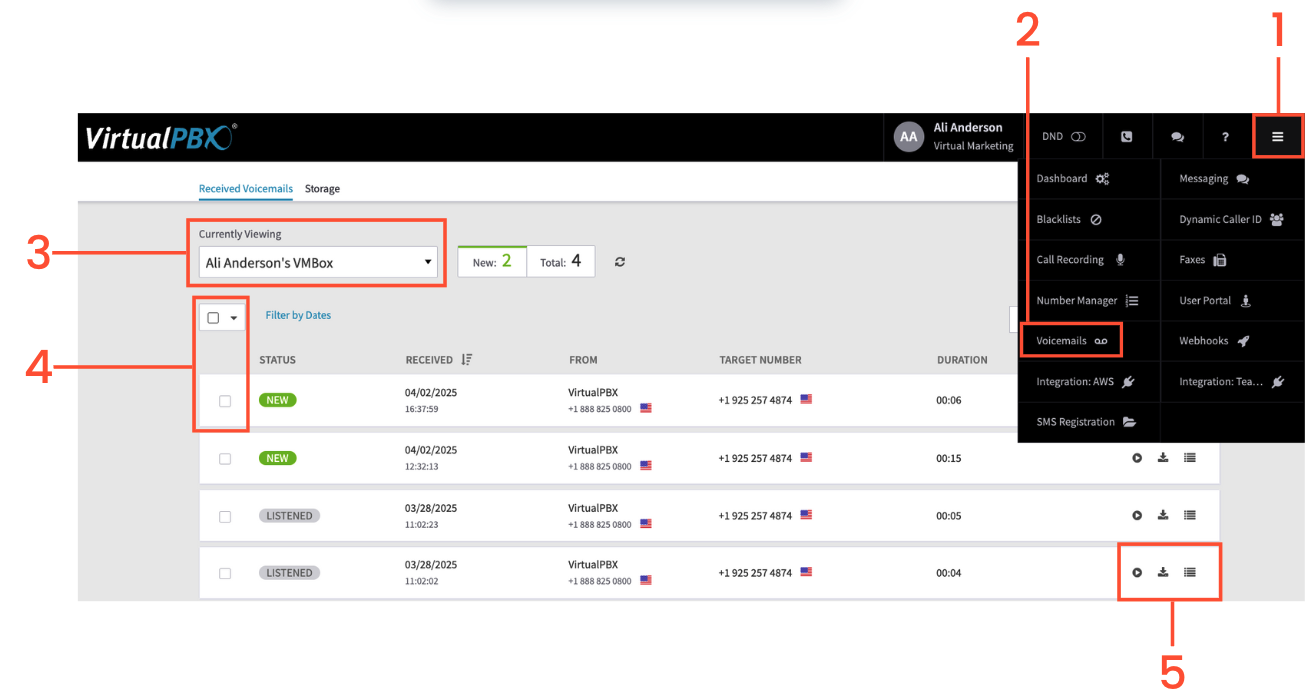
Navigate to the hamburger menu in the top right of the Dashboard
Select “Voicemails”
Choose the voicemail box that you want to access from the dropdown
You can either “Select All” near the top, or individually select which voicemail you want to access or delete
A. You will then have four options, Mark as New, Mark as Listened, Mark as Deleted and Delete. You can either select “Mark as Deleted or Delete before refreshing the page to delete the voicemails.
You can also choose to either Play / Download / Get more information about voicemails on the right side of the screen.
From User Portal
Log in as a User
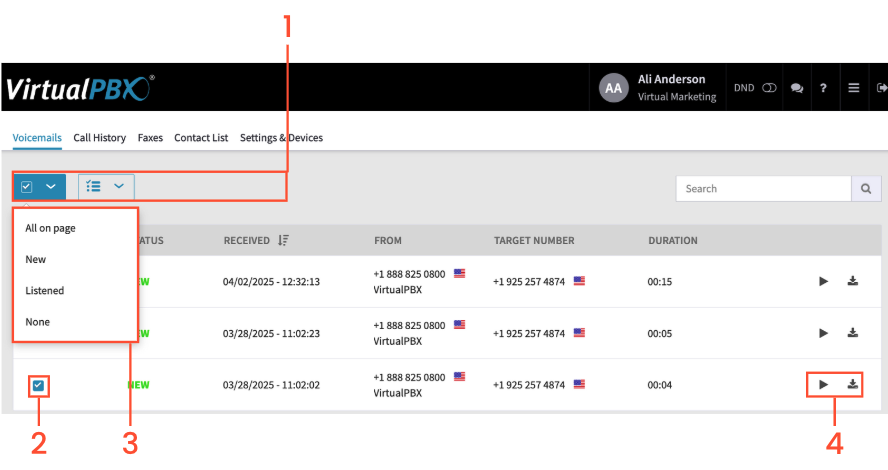
Click on the box in front of a Voicemail to change its status
You can choose to Mark as New, Mark as Listened or Mark As Deleted
To listen or download your voicemails click on the icons at the far right.
Keep in mind that you can only store up to 100 voicemails before the voicemail box is full.
Set Up Office Hours and Holidays
Through your main number routing you can decide if you would like your routing to be the same 24/7, or if you would like to set up specific office hours. Setting specific office hours will allow you to have a separate routing for after hours, as to not receive calls at all hours of the day.
Office Hours Strategy Setup
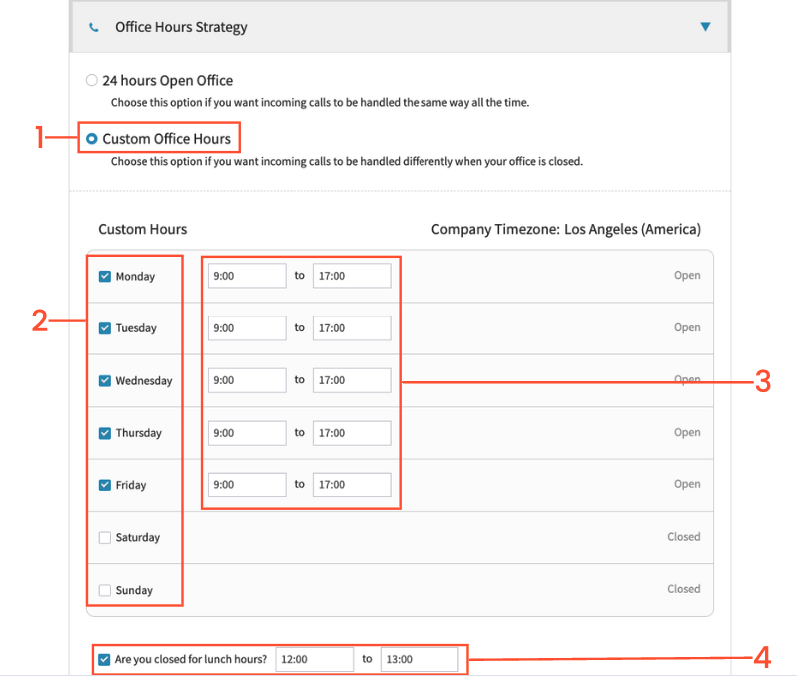
Choose ‘Custom Office Hours’ to switch from the default ‘24 Hours Open Office’
Choose which days you will be open
Choose your specific hours
Check if you are closed for lunch Note - if you choose this option, you will need to set up lunch hour routing as well.
Office Holidays Setup
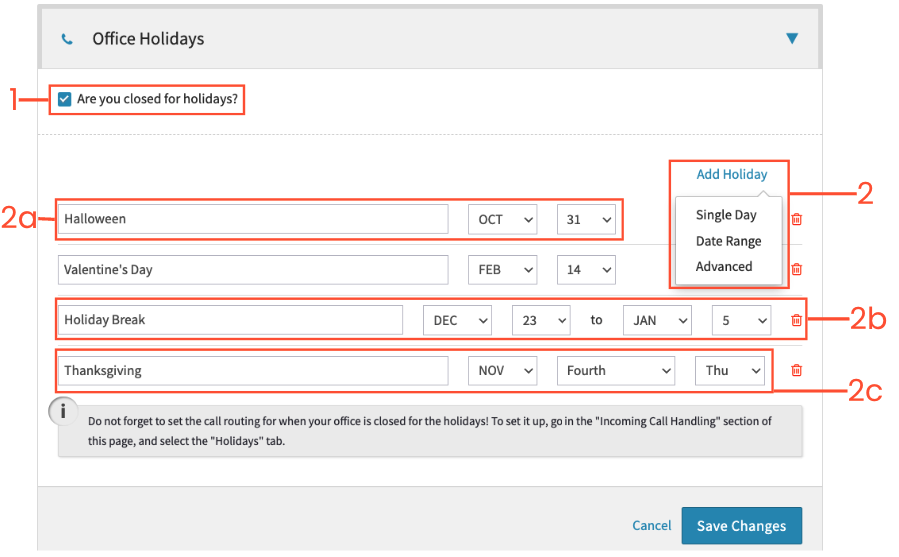
If you will be closed for holidays, make sure the box is checked.
Next, click on Add Holiday, select the type of Holiday, and give it a name/description.
a. Single Day - One day Holidays recurring yearly b. Date Range - Range of dates for a Holiday Break (IE: Xmas break) c. Advanced - Allows you to select certain days of the month (For example, the fourth Thursday in November for Thanksgiving)Click Save Changes to save the new Holidays. Note - when holidays are chosen, you will need to create separate routing
Set Up Incoming Call Handling
Incoming Call Handling is how you set up your routing for your main business number. Whatever journey you set for your customers to follow when calling in will be set here
Incoming Call Handling
Incoming Call Handling allows you to control how incoming calls to your main business number will be routed.
Things to know:
You must have a Main Number assigned before you can see most configuration options
This portion of the system is usually where you tie everything else together. It is highly recommended you have set up your users, groups, queues, etc before completing these steps.
If you have open and closed hours, you will need to individually configure how your system works doing those different periods. This also applies to lunch hours and holidays, should you choose to make use of those.
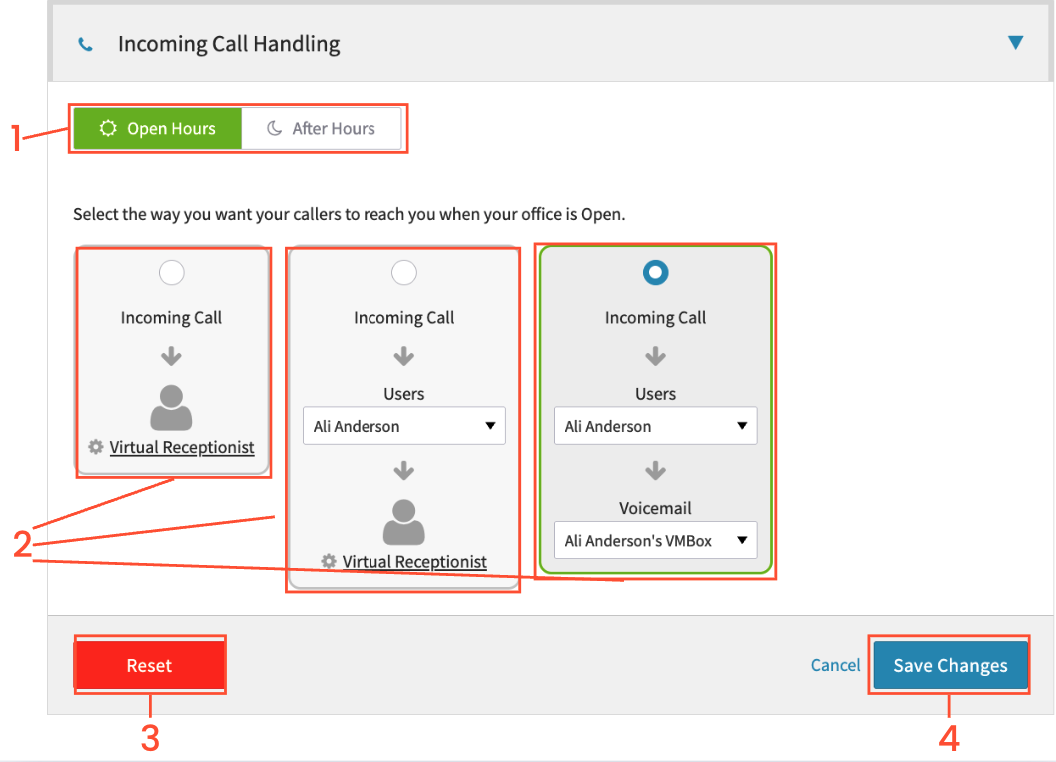
If you have office hours strategy and/or Holiday strategies turned on, choose which routing option you would like to work on
Select the routing option you wish to use
Reset will reset all incoming call handling settings. This includes all Virtual Receptionist settings, and all of the various time options.
After making any changes, click on ‘Save Changes’
Option 1: Incoming Call to Virtual Receptionist
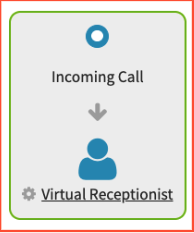
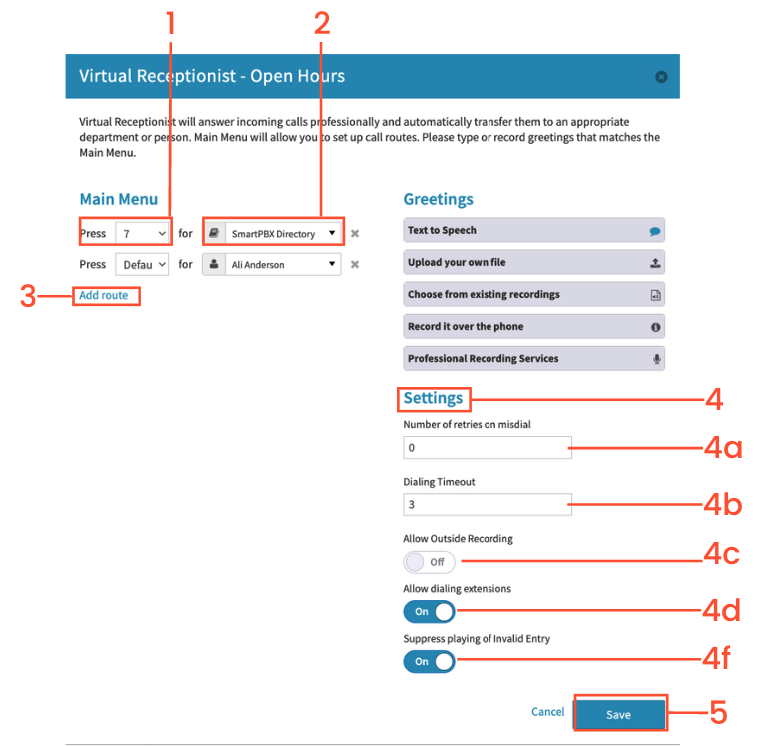
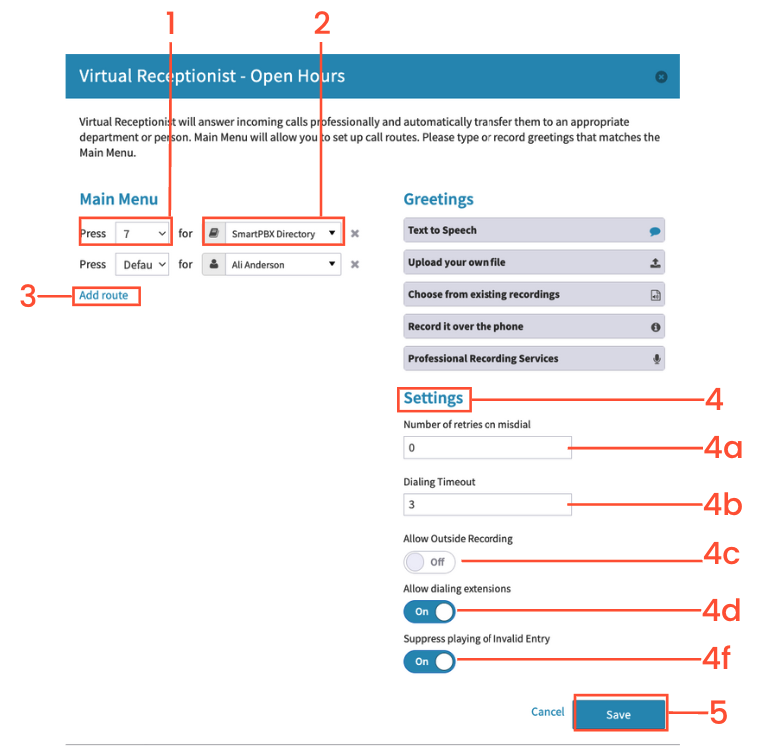
Click on the first pull-down and select 0-9, * or default action, which will route directly to your chosen routing when a caller does not choose an option.
Click on the 2nd pull down to select where the calls route. You can select, users, devices, groups, Voicemail boxes, the SmartPBX Directory or even media files.
Add more routes through ‘Add Route’
There are multiple settings to edit for your incoming call handling. a. Number of retries on misdial: The amount of times your greeting will replay after the initial greeting should your caller not choose an option presented or dial an incorrect number. Note - the initial greeting will not count, so the number entered will be additive to the first greeting b. Dialing Timeout: Amount of seconds the system will wait before either replaying the greeting, defaulting to your chosen action, or dropping the call. c. Allow Outside Recording: Allows you you to record your main greeting using any phone. By default you are only able to use a VoIP devices linked in the system to record greetings. d. Allow dialing extensions: Allows callers to dial extensions for ring groups or users from the greeting page. You will need this turned on if you are planning on using a directory of any kind in your greeting. f. Suppress playing of Invalid Entry: Will suppress dialers from choosing an option/extension not in the system.
Once you have set your configuration, press ‘Save’ to make sure your account had been completely updated.
Option 2: Incoming Call to a Specific Option, then to Virtual Receptionist
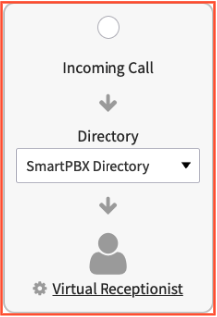
Using this option will route first to a selected user, group, or device. If the option routed to first fails to answer or is busy, the inbound caller will be transferred to the Virtual Receptionist.
This option has a set ring duration of 20 seconds for the initial user or group selected. If the call goes to the Virtual Receptionist, then rules for the user menu option or group will be followed. Note: This option will override device-level settings, i.e. use cell phone voicemail.
Click the pulldown to choose where the call will initially route to, then edit your Virtual Receptionist.
Click on the first pull-down and select 0-9, * or default action, which will route directly to your chosen routing when a caller does not choose an option.
Click on the 2nd pull down to select where the calls route. You can select, users, devices, groups, Voicemail boxes, the SmartPBX Directory or even media files.
Add more routes through ‘Add Route’
There are multiple settings to edit for your incoming call handling. a. Number of retries on misdial: The amount of times your greeting will replay after the initial greeting should your caller not choose an option presented or dial an incorrect number. Note - the initial greeting will not count, so the number entered will be additive to the first greeting b. Dialing Timeout: Amount of seconds the system will wait before either replaying the greeting, defaulting to your chosen action, or dropping the call. c. Allow Outside Recording: Allows you you to record your main greeting using any phone. By default you are only able to use a VoIP devices linked in the system to record greetings. d. Allow dialing extensions: Allows callers to dial extensions for ring groups or users from the greeting page. You will need this turned on if you are planning on using a directory of any kind in your greeting. f. Suppress playing of Invalid Entry: Will suppress dialers from choosing an option/extension not in the system.
Once you have set your configuration, press ‘Save’ to make sure your account had been completely updated.
Option 3: Incoming Call to a User, Group, or Device then to Voicemail Box
This routes inbound callers to a user, device or even a media file then will be transferred to the voicemail box of your choice. You can also choose to route directly to voicemail on this option.
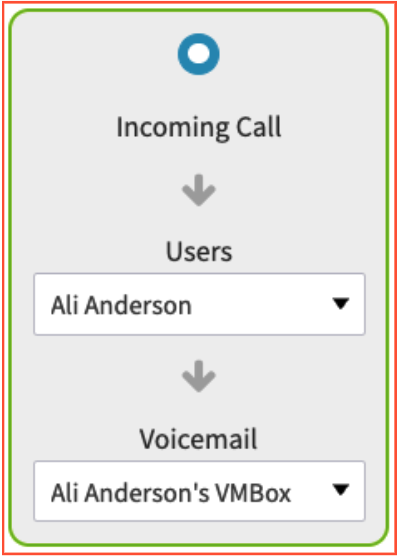
Click on the pull down to select a user, device, group, media file or Skip to Voicemail
Click the pull-down to select the voicemail box that you want the caller to end up at
Click on Save Changes
Option 4: Incoming Calls sent to an Advanced Call Flow or secondary Auto-Attendant
If your account has an Advanced CallFlow or supports multiple auto-attendants and you have made one or more available in main menu you will have the option to have your Main numbers route these options.
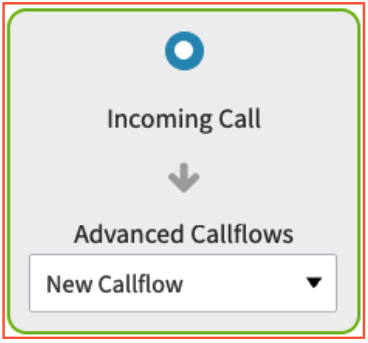
Choose which option to select, and then choose ‘Save Changes’
Greeting Options for Virtual Receptionist
There are multiple options for the greetings on your Virtual Receptionist. You can find these by clicking into the Virtual Receptionist on the first option or second option for call routing.
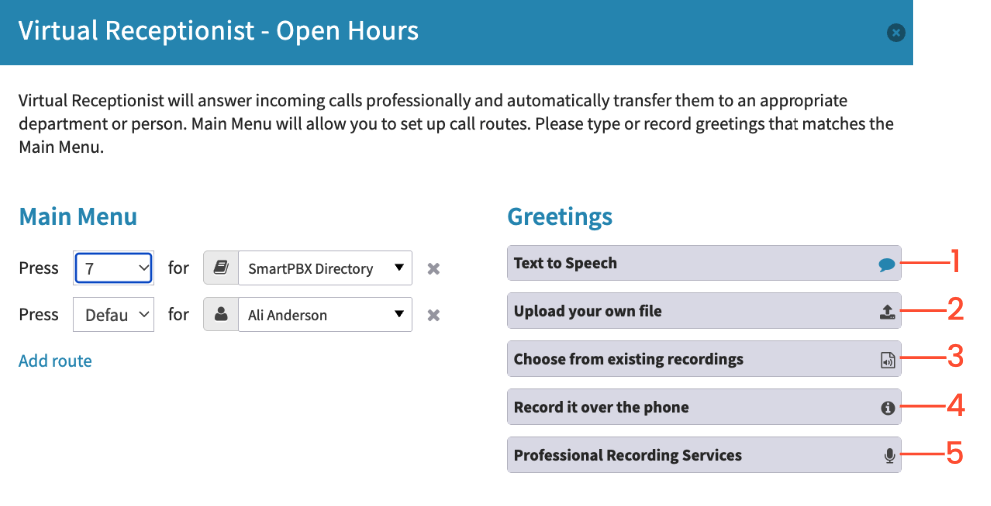
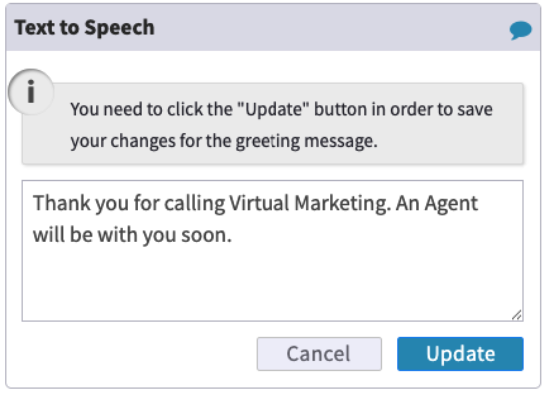
1. Text to Speech
Type in your script and a synthesized main greeting will be created for you. The character limit is 250-350 characters. Typically, you are aiming to identify your company name and tell callers what option to press to route the call to a specific department person or feature. This is a great feature
Doing this multiple times for the same period of hours (Open hours for example) will create multiple instances with the same media file name, so we recommend deleting or renaming old versions in your Greetings Manager (Menu on the left side of Dashboard) to avoid confusion.
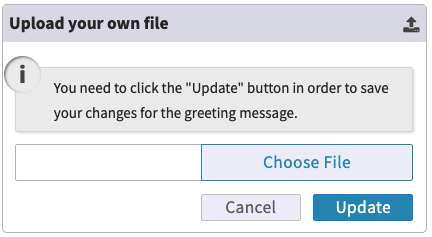
2. Upload your own file
The dashboard currently accepts . WAV and . MP3 file formats for upload. File size is currently limited to no more than 1 MB, which is approximately a 5-minute MP3 file.
When preparing files for use with Dash please use the following parameters:
MP3/WAV file format
1 MB max file size - MP3 is recommended for longer durations
You can use a program like Audacity to record a file on your computer.
If the file you create is too large you will want to find a way to compress the file, either online or via an application.
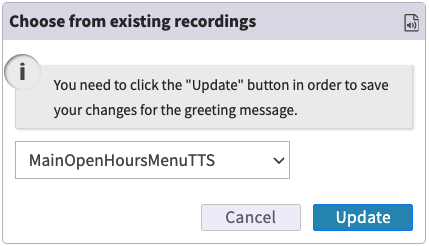
3. Choose from existing recordings
Use Choose from existing recording to select a media file you have already added to the system. The pull-down will show all media files, including hold music, voicemail greetings, or main greetings
4. Record it over the phone
Call the main number from a VoIP phone (Non-VoIP instructions further below), and dial the PIN for the hours period in which you are attempting to update. Please note if you are trying to change your after-hours greeting over the phone, you MUST call in during your after-hours period. The same idea applies to open, lunch, and holiday hours, if applicable.
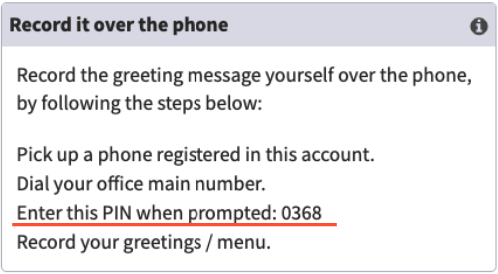
Please note that you must have a VoIP phone/device registered to your account. Record the greeting message yourself over the phone, by following the steps below:
Pick up a VoIP phone registered in this account
Dial your office's main number
Enter this PIN when prompted: XYZ (this will vary from account to account)
Record your greetings/menu
For Non-VoIP phones, you will need to turn on ‘Allow Outside Recording’ on the Virtual Receptionist’s settings. The person calling will now be able to do the same as a VoIP phone.
5. Professional Recording Services
You can order a professional recording through our partner SnapRecordings by either clicking ‘Order’ or going directly to https://www.snaprecordings.com/virtualpbx
Add a Main Company Number
Upon account creation you will either have a default number or chosen number as your Main Number. To port in your main number from a separate carrier, please refer to our guide here
PLEASE NOTE: When logging in to your account for the first time you will need to set your Main Caller ID. You will need to choose a number here to be able to make outbound calls. This can be changed in the future if need be.
Main Company Number
You can add new numbers on your Main Number page. You can have multiple main numbers on your account, all of which will go through the routing you set up through your Incoming Call Handling.
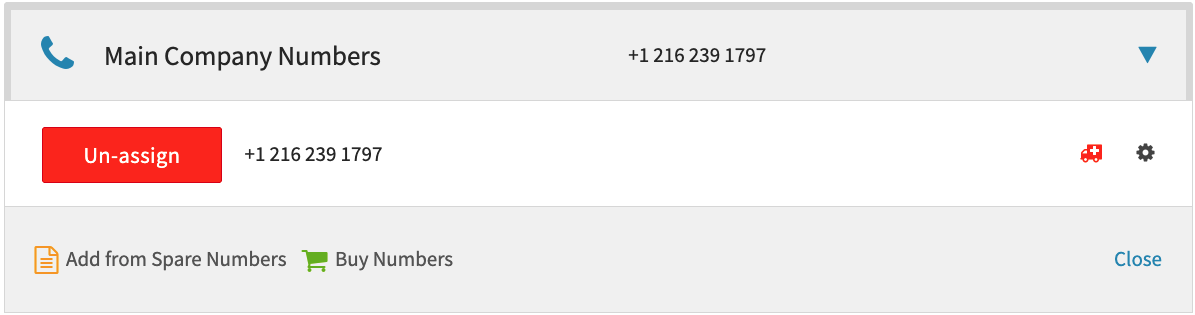
Click on the phone numbers tab for your user, from here you can buy a number, or add a spare number you already have.
Buying a Number
For local numbers, choose the area code to search by. You can also choose to display only sequential numbers.
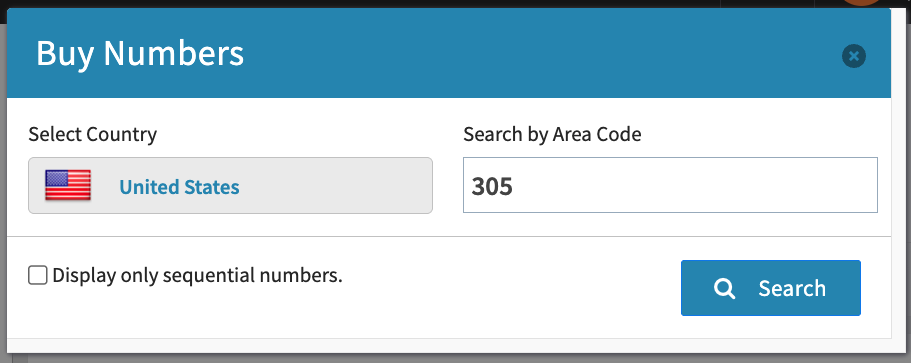
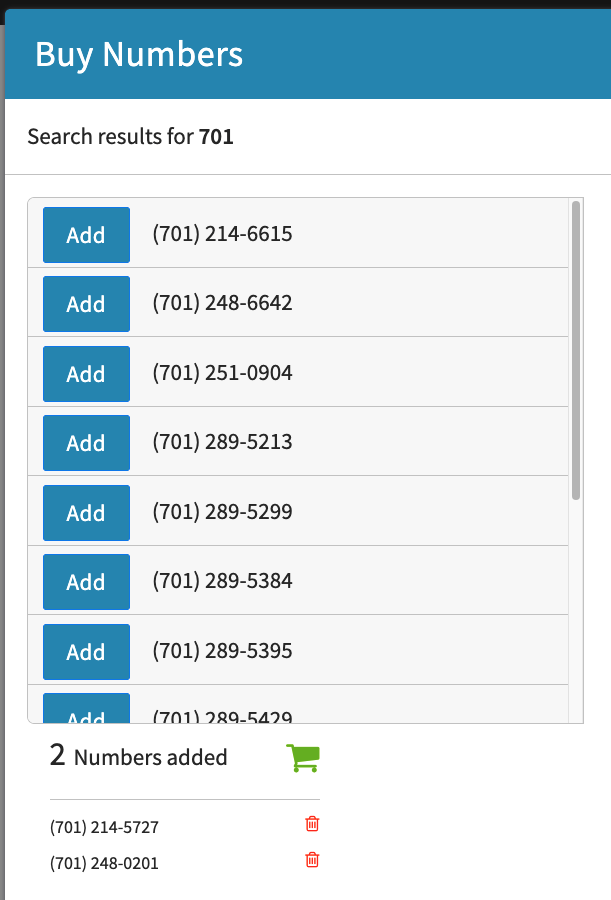
Add which numbers you would like to purchase, scroll down, and choose ‘Buy Numbers’
For Toll-Free numbers, you will be able to choose from a set toll-free prefix.
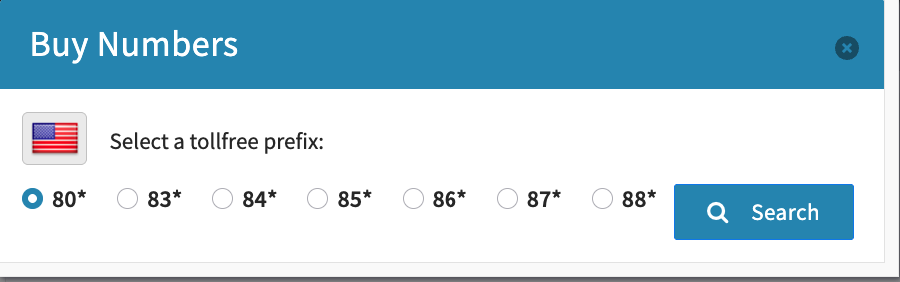
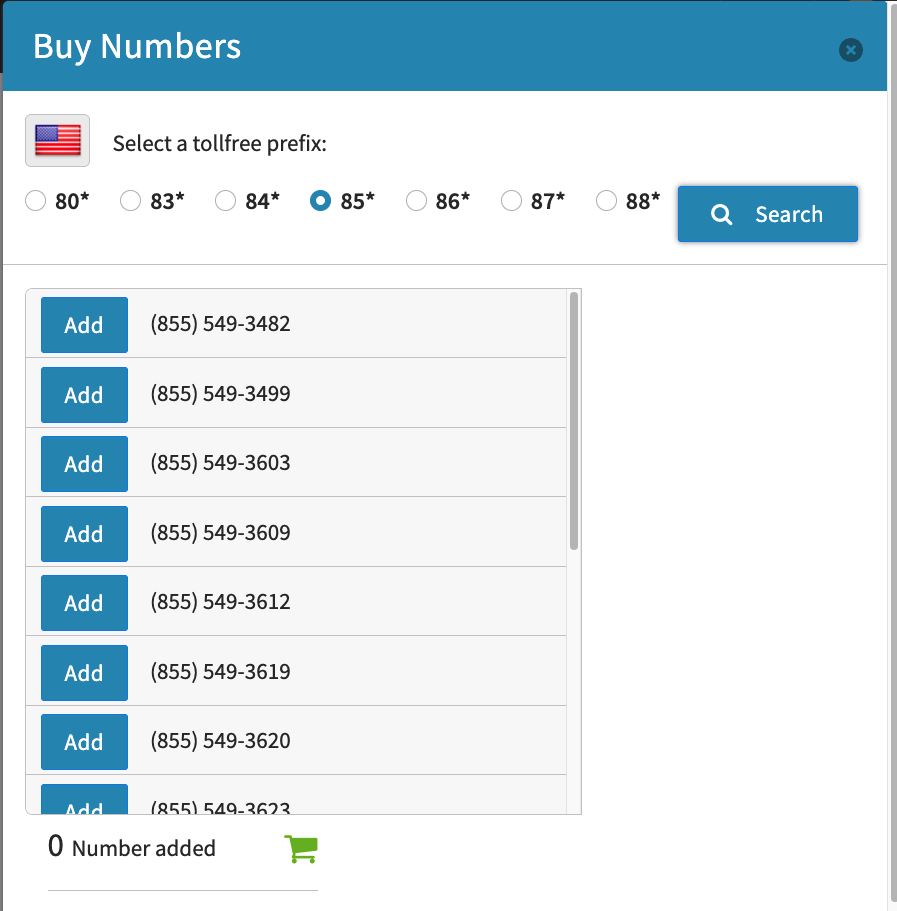
Add which numbers you would like to purchase and choose ‘Buy Numbers’ at the bottom of your screen.
Once numbers have been added, you will be able to use them in your call routing.
Add from Spare Numbers
If you have numbers that are not currently assigned anywhere, you will see them on your ‘Spare Numbers’ tab. You can choose these numbers by clicking ‘Add from Spare Numbers’
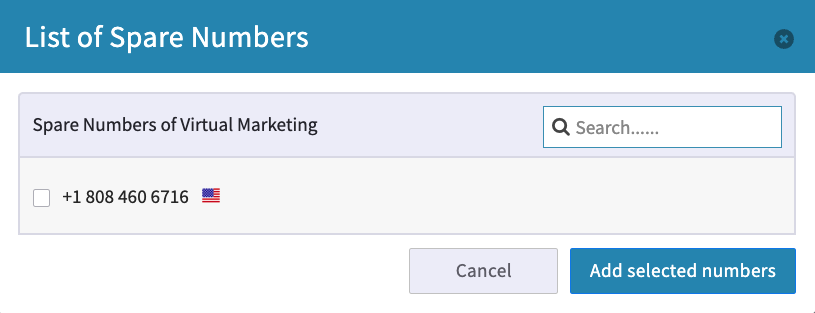
Main Number Settings
Click on the cog on the right-hand side of your number to edit Caller-ID, e911, Prepends, and to sync your account.
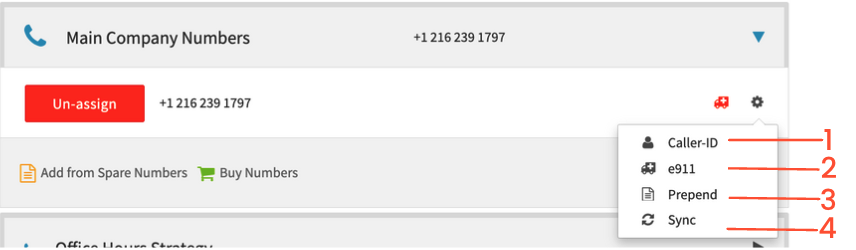
1. Caller-ID
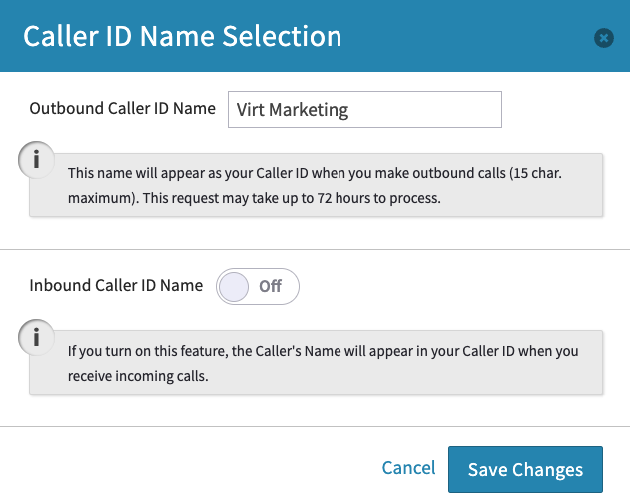
Your Caller ID will appear when making outbound calls, and has a maximum character limit of 15. You can also turn on the Inbound Caller ID to allow you to see what a caller dialing in to speak with you has set as theirs.
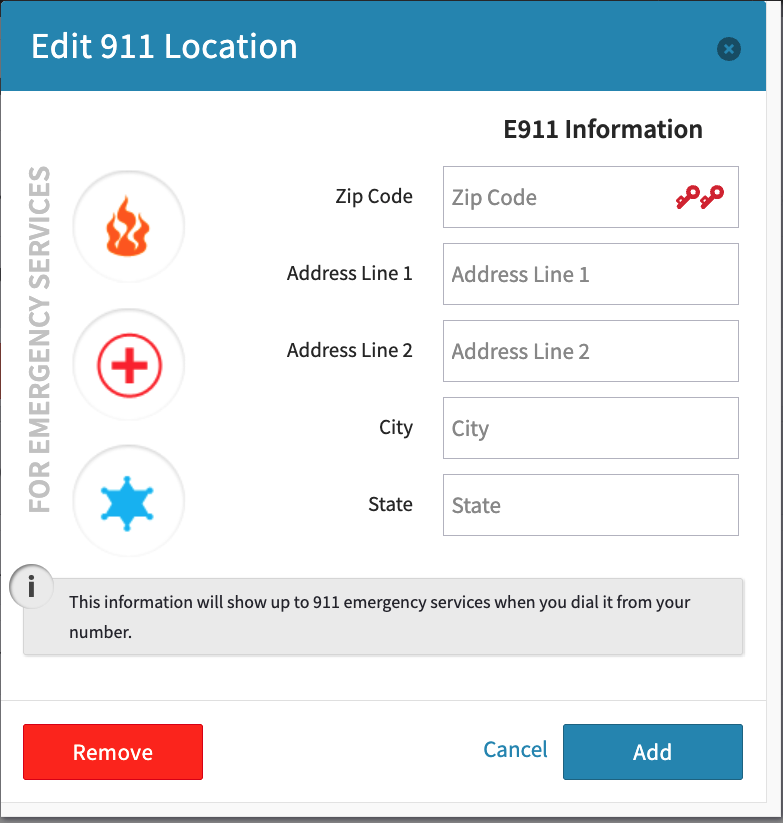
2. e911
This filled out address will appear to 911 emergency services, should you have to dial it from your VirtualPBX VoIP device
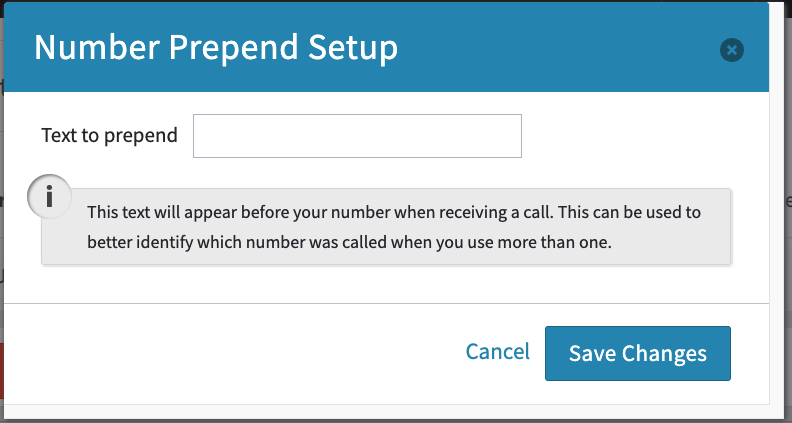
3. Prepend
Utilize prepends to identify which number is being called by filling this out. This can be helpful if you have multiple numbers you provide for different purposes to customer (i.e. Sales, Main Number, Accounts Receivable)
4. Sync
When chosen, this will sync your number with your account.
Main Conference Number
Conferencing allows you to essentially start a professional group call, managed by the users on your system. Before your users are able to utilize conferencing, you will need to create a main conference number.
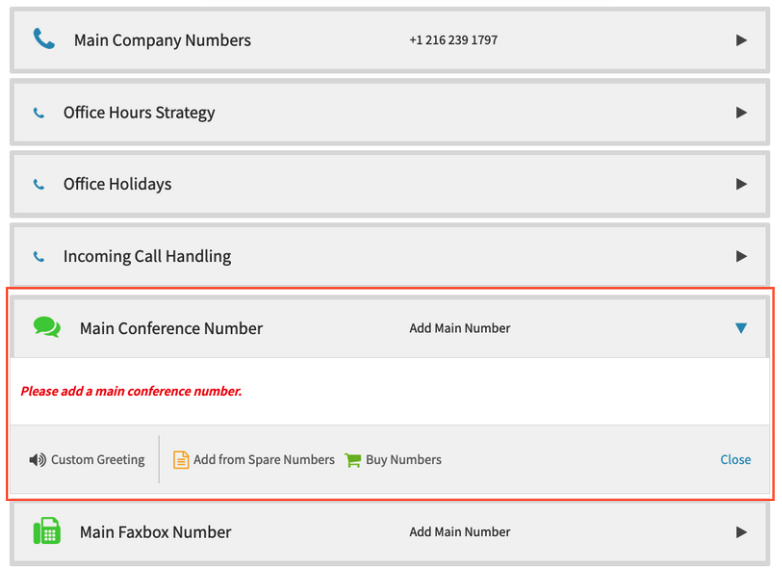
You can either add your new number from spare numbers, or purchase a new number.
Purchasing a Number
For local numbers, choose the area code to search by. You can also choose to display only sequential numbers.
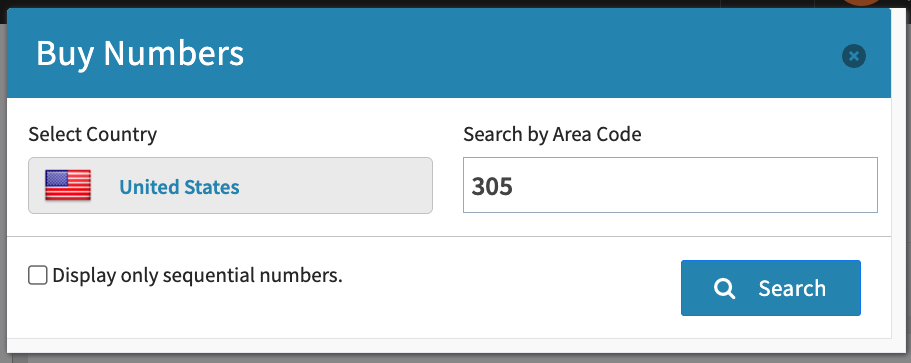
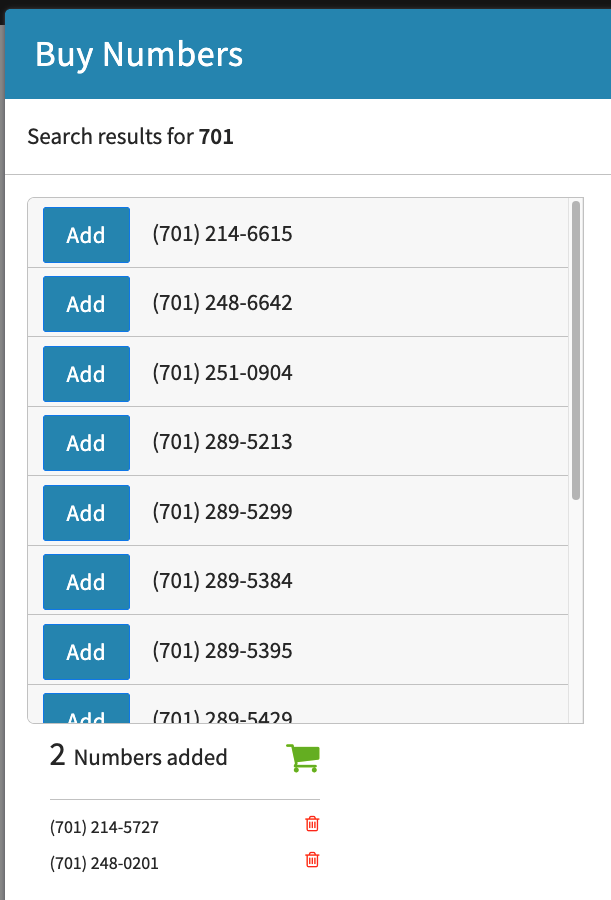
Add which numbers you would like to purchase, scroll down, and choose ‘Buy Numbers’
For Toll-Free numbers, you will be able to choose from a set toll-free prefix.
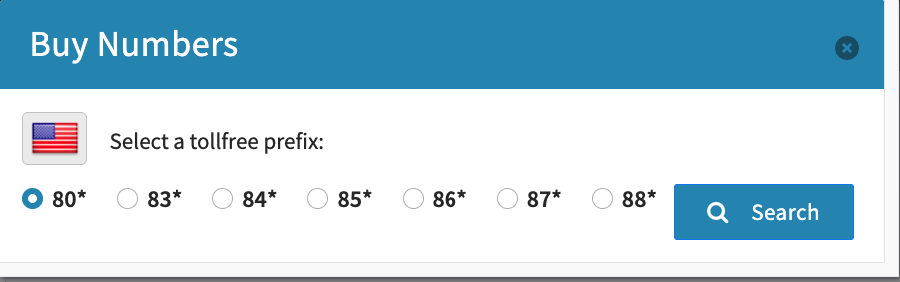
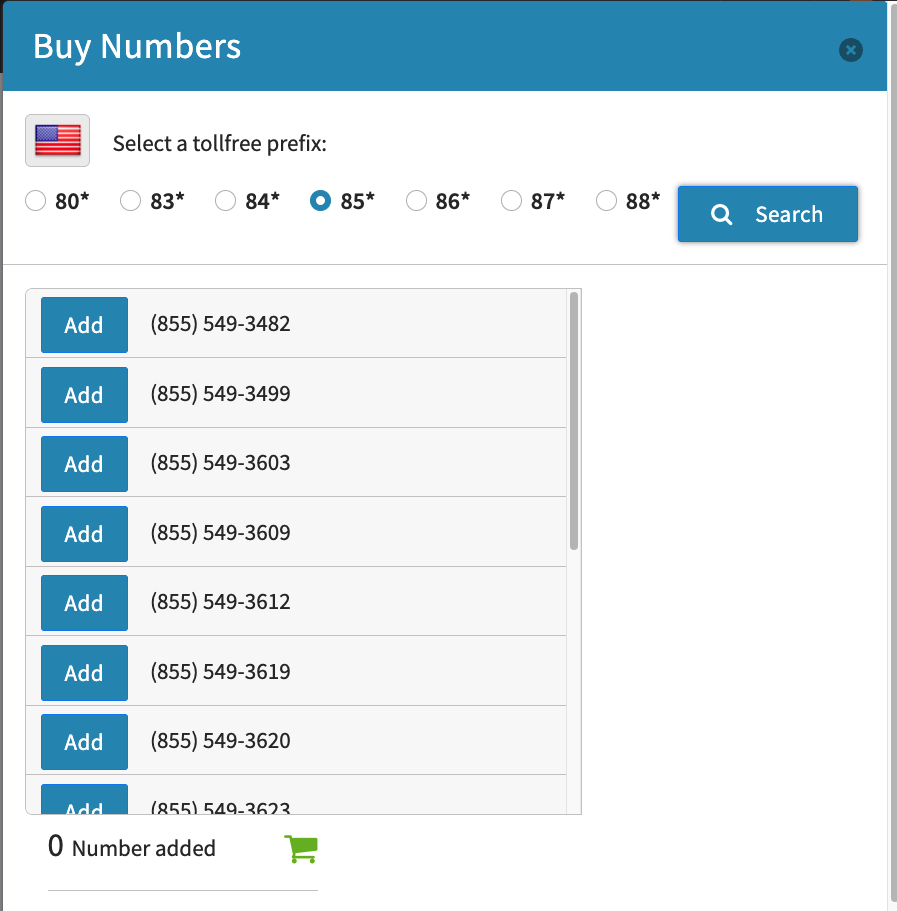
Add which numbers you would like to purchase and choose ‘Buy Numbers’ at the bottom of your screen.
Once numbers have been added, you will it for your conference number.
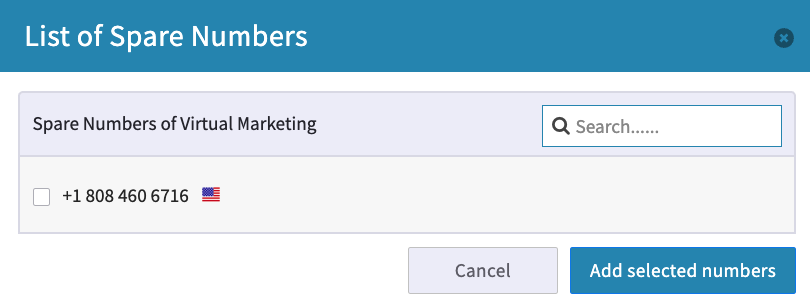
Adding from Spare Numbers
If you have numbers that are not currently assigned anywhere, you will see them on your ‘Spare Numbers’ tab. You can choose these numbers by clicking ‘Add from Spare Numbers’
Custom Greeting
Utilize our custom greeting field for a Text-to-Speech greeting which will play when callers dial your conference number.
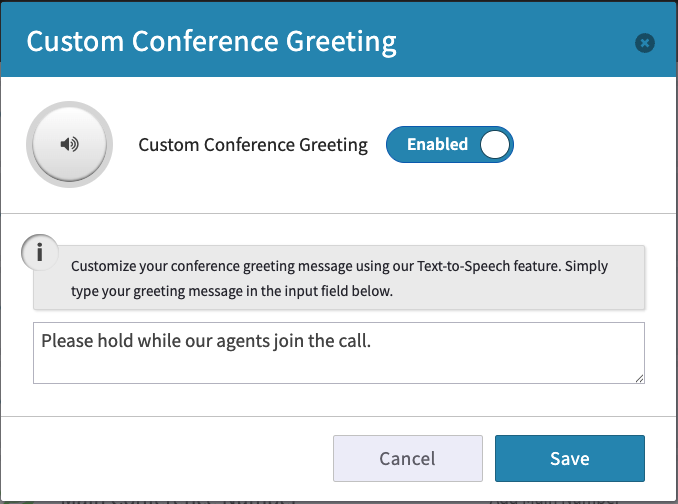
Once your conference number has been set up, you can turn on the conferencing availability on the user level. Refer to our user guide here to do so.
Main Fax Number
This is your main number for internet faxes. You can also add faxbox numbers at the user level.
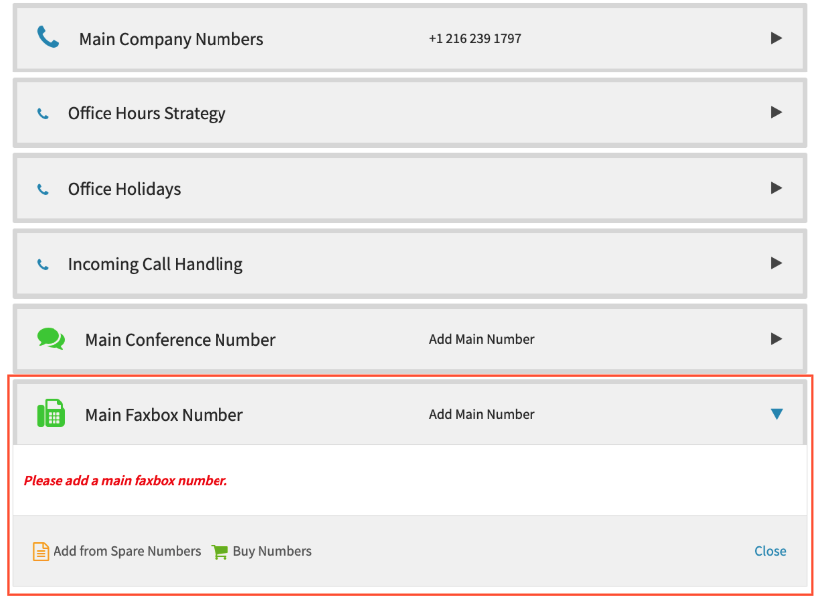
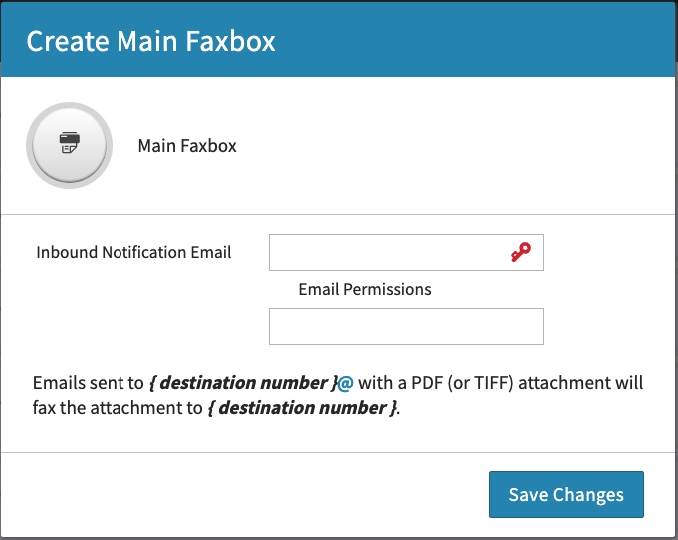
Once you have added a number to your Main Faxbox, you will need to add an Inbound Notification Email for internet faxes.
Blast Off!
Congratulations!
Your basic features have been set up. Your business number is now ready to use, and you’re ready to hit the ground running.
So, what’s next?
Looking for some more advanced features, or more documentation on our features? Check out our Knowledge Base
Looking to expand your business to include more products from VirtualPBX? Check out our full list of products here.
Wanting to sign up your business for SMS? Check out our Registration Guide here.
Needing additional Support?